Introduction au simulateur de Robot
Le simulateur «Robot Simulation» rend possible la programmation d’un robot virtuel dans le cas où une équipe ne dispose d’un véritable robot. WPILib offre aux équipes la possibilité de simuler diverses fonctionnalités du robot virtuellement à l’aide de simples commandes Gradle.
L’utilisation du simulateur nécessite l’activation de Desktop Support. Cela peut se faire en cochant la case à cocher « Enable Desktop Support Checkbox » lors de la création de votre projet de robot ou en exécutant « WPILib: Change Desktop Support Enabled Setting » à partir de la palette de commandes Visual Studio Code.


La prise en charge du bureau peut également être activée en modifiant manuellement votre fichier build.gradle situé à la racine de votre projet de robot. Il suffit de changer includeDesktopSupport = false pour includeDesktopSupport = true
Important
Il est important de noter que l’activation de la prise en charge de bureau/simulation peut avoir des conséquences imprévues. Tous les fournisseurs ne prennent pas en charge cette option, et le code qui utilise leurs bibliothèques peut même se planter lors de la tentative d’exécution de la simulation!
If at any point in time you want to disable Desktop Support, simply re-run the « WPILib: Change Desktop Support Enabled Setting » from the command palette or change includeDesktopSupport to false in build.gradle.
Note
C++ robot simulation requires that a native compiler to be installed. For Windows, this would be Visual Studio 2022 version 17.9 or later (not VS Code), macOS requires Xcode 14 or later, and Linux (Ubuntu) requires the build-essential package.
Assurez-vous que l’option Desktop Development with C++ est cochée dans le programme d’installation de Visual Studio pour la prise en charge de la simulation.

Running Robot Simulation
Basic robot simulation can be run using VS Code. This can be done by using VS Code’s command palette WPILib: Simulate Robot Code as shown below.


The Sim GUI option will be selected by default. This will launch the Simulation GUI. You can also launch simulation without a GUI by unchecking Sim GUI in which case your console output in Visual Studio Code should look like the below.
********** Robot program starting **********
Default disabledInit() method... Override me!
Default disabledPeriodic() method... Override me!
Default robotPeriodic() method... Override me!
If you would would like to prevent the pop up and only use build.gradle to configure your simulation settings you can add the following in your vscode settings.json file.
"wpilib.skipSelectSimulateExtension": true
Avertissement
You may see a run button next to the WPILib button. This button does not set up simulation appropriately and should not be used. Instead, the menu item shown above WPILib: Simulate Robot Code should be used.

Note
La simulation peut également être exécutée en dehors de VS Code en utilisant ./gradlew simulateJava pour Java ou ./gradlew simulateNative pour C++.
Note
Some vendors support attaching hardware to your PC and using the hardware in desktop simulation (e.g. CANivore). See vendor documentation for more information about the command WPILib: Hardware Sim Robot Code.
GUI simulation support is installed by default when you install RobotPy.
There is a robotpy subcommand that you can execute to run your code in simulation:
py -3 -m robotpy sim
python3 -m robotpy sim
python3 -m robotpy sim
Exécution des tableaux de bord du robot
Shuffleboard, SmartDashboard, Glass, and AdvantageScope can be used with WPILib simulation when they are configured to connect to the local computer (i.e. localhost).
Shuffleboard
Shuffleboard is automatically configured to look for a NetworkTables instance from the robotRIO but not from other sources. To connect to a simulation, open Shuffleboard preferences from the File menu and select NetworkTables under Plugins on the left navigation bar. In the Server field, type in the IP address or hostname of the NetworkTables host. For a standard simulation configuration, use localhost.

SmartDashboard
SmartDashboard is automatically configured to look for a NetworkTables instance from the roboRIO, but not from other sources. To connect to a simulation, open SmartDashboard preferences under the File menu and in the Team Number field, enter the IP address or hostname of the NetworkTables host. For a standard simulation configuration, use localhost.

Glass
Glass is automatically configured to look for a NetworkTables instance from the roboRIO, but not from other sources. To connect to a simulation, open NetworkTables Settings under the NetworkTables menu and in the Team/IP field, enter the IP address or hostname of the NetworkTables host. For a standard simulation configuration, use localhost.

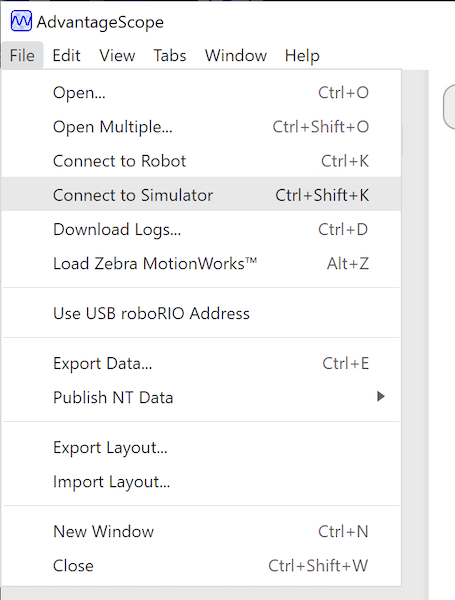
AdvantageScope
No configuration is required to connect to a NetworkTables instance running on the local computer. To connect to a simulation, click Connect to Simulator under the File menu or press Ctrl+Shift+K.