Introducción del Control de la Versión Git
Importante
Una guía a mayor profundidad se encuentra disponible en el sitio Web Git.
Git es un sistema de control de versiones distribuido (VCS) creado por Linus Torvalds, también conocido por crear y mantener el kernel de Linux. Version Control es un sistema de seguimiento de cambios de código para desarrolladores. Las ventajas de Git Version Control son:
Separation of testing environments into branches
Habilidad de navegar a un commit particular sin remover el historial
Habilidad para administrar commits de distintas formas, incluso combinándolos
Para ver más características, da click aquí
Prerrequisitos
Importante
En el tutorial se utiliza el sistema operativo Windows.
Para descargar e instalar Git utilize los siguientes links:
Nota
Es probable que necesite añadir Git a su ruta
Vocabulario Git
Git revolves around several core data structures and commands:
Repositorio: la estructura de datos de su código, incluyendo la carpeta
.giten el directorio principalCommit: a particular saved state of the repository, which includes all files and additions
Branch: a means of grouping a set of commits. Each branch has a unique history. This is primarily used for separating development and stable branches.
Push: actualiza el repositorio remoto con sus cambios locales
Pull: actualiza el repositorio local con los cambios remotos
Clone: retrieve a local copy of a repository to modify
Fork: duplicate a pre-existing repository to modify, and to compare against the original
Merge: combine various changes from different branches/commits/forks into a single history
Repositorio
Un repositorio de Git es una estructura de datos que contiene la estructura, historial, y archivos de un proyecto.
Los repositorios de Git usualmente están conformados por:
Una carpeta
.git. Esta carpeta contiene diversa información sobre el repositorio.Un archivo
.gitignore. Este archivo contiene los archivos o directorios que no quiera incluir cuando actualice el repositorio (commit).Archivos y carpetas. Este es el contenido principal del repositorio.
Crear un repositorio
You can store the repository locally, or through a remote – a remote being the cloud, or possibly another storage medium or server that hosts your repository. GitHub is a popular free hosting service. Numerous developers use it, and that’s what this tutorial will use.
Nota
Hay varios proveedores que pueden ofrecer repositorios. Gitlab y Bitbucket son algunas alternativas a Github.
Crear una cuenta de GitHub
Go ahead and create a GitHub account by visiting the website and following the on-screen prompts.

Creación Local
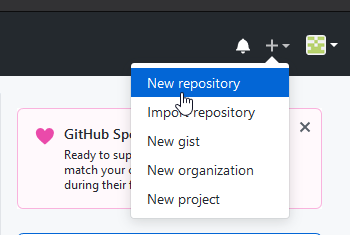
Después de crear y verificar su cuenta, querrá visitar la página de inicio. Se verá similar a lo que muestra la imagen.

De clic en el ícono de más (+) de la esquina superior derecha.

Después de click en “New Repository”

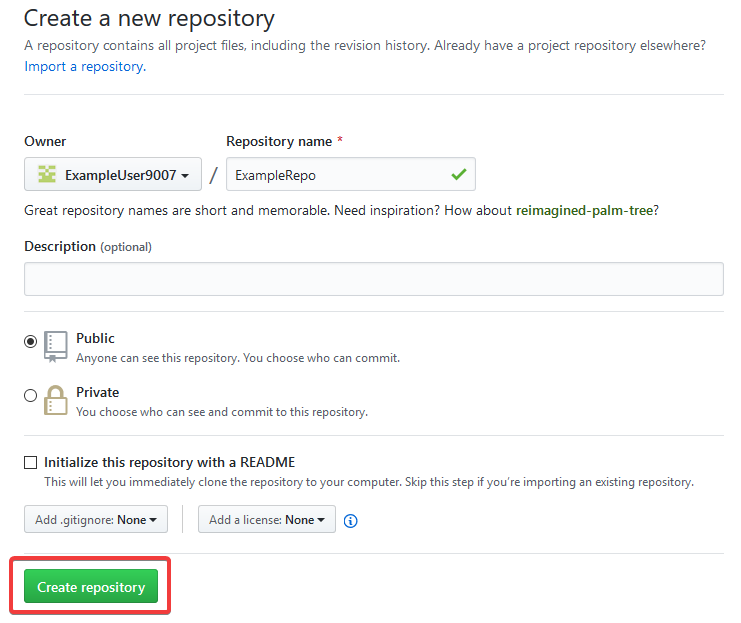
Llene con la información correspondiente, y después de clic en “Create repository”

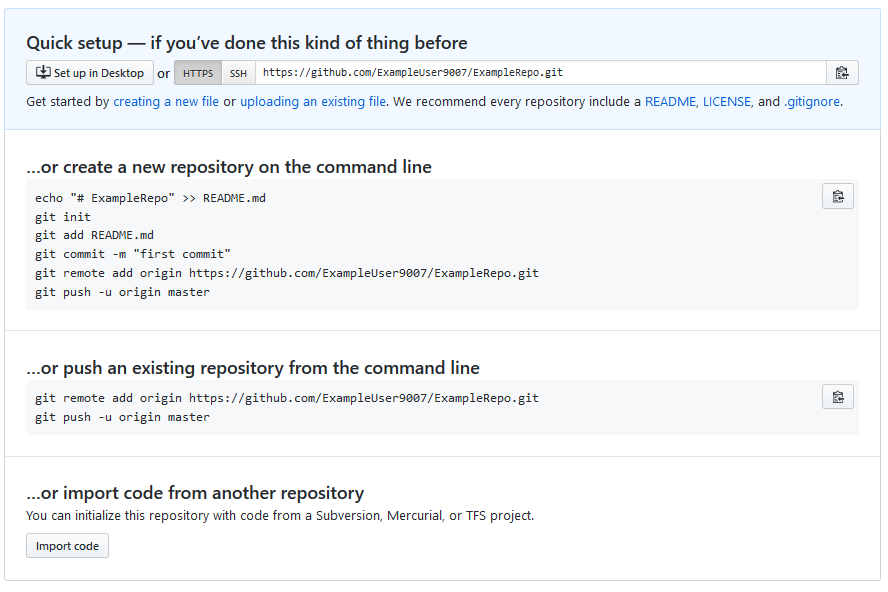
Debe ver una pantalla similar a esta

Nota
The keyboard shortcut Ctrl+~ can be used to open a terminal in Visual Studio Code for Windows.
Ahora querrá abrir una ventana de PowerShell y navegar al directorio de su proyecto. Se puede encontrar un excelente tutorial sobre PowerShell aquí.. Consulte su motor de búsqueda sobre cómo abrir un terminal en sistemas operativos alternativos.

If a directory is empty, a file needs to be created in order for git to have something to track. In the below Empty Directory example, we created a file called README.md with the contents of # Example Repo. For FRC® Robot projects, the below Existing Project commands should be run in the root of a project created by the VS Code WPILib Project Creator. More details on the various commands can be found in the subsequent sections.
Nota
Reemplace la ruta de archivo "C:\Users\ExampleUser9007\Documents\Example Folder" con la que desea crear el repositorio y reemplace la URL remota https://github.com/ExampleUser9007/ExampleRepo.git con la URL del repositorio que creó en los pasos anteriores.
> cd "C:\Users\ExampleUser9007\Documents\Example Folder"
> git init
Initialized empty Git repository in C:/Users/ExampleUser9007/Documents/Example Folder/.git/
> echo "# ExampleRepo" >> README.md
> git add README.md
> git commit -m "First commit"
[main (root-commit) fafafa] First commit
 1 file changed, 1 insertions(+), 0 deletions(-)
 create mode 100644 README.md
> git remote add origin https://github.com/ExampleUser9007/ExampleRepo.git
> git push -u origin main
> cd "C:\Users\ExampleUser9007\Documents\Example Folder"
> git init
Initialized empty Git repository in C:/Users/ExampleUser9007/Documents/Example Folder/.git/
> git add .
> git commit -m "First commit"
[main (root-commit) fafafa] First commit
 1 file changed, 1 insertions(+), 0 deletions(-)
 create mode 100644 README.md
> git remote add origin https://github.com/ExampleUser9007/ExampleRepo.git
> git push -u origin main
Commits
Los repositorios están conformados principalmente por commits. Los commits son estados guardados o versiones de código.
En el ejemplo anterior, creamos un archivo llamado README.md. Abra ese archivo en su editor de texto favorito y edite algunas líneas. Después de jugar un poco con el archivo, simplemente guárdelo y ciérrelo. Navegue hasta PowerShell y escriba los siguientes comandos.
> git add README.md
> git commit -m "Adds a description to the repository"
[main bcbcbc] Adds a description to the repository
 1 file changed, 2 insertions(+), 0 deletions(-)
> git push
Nota
Writing good commit messages is a key part of a maintainable project. A guide on writing commit messages can be found here.
Git Pull
Nota
git fetch puede ser utilizado cuando el usuario no desea que automáticamente se fusione con la rama en la que se está trabajando
Este commando recupera el historial o los commits del repositorio remoto. Cuando el remoto contiene el trabajo que usted no tiene, éste intentará fusionarlo automáticamente. Vea Fusionar.
Corra: git pull
Git Add
This command «stages» the specified file(s) so that they will be included in the next commit.
For a single file, run git add FILENAME.txt where FILENAME.txt is the name and extension of the file to add.
To add every file/folder that isn’t excluded via gitignore,
run git add .. When run in the root of the repository this command will stage every untracked, unexcluded file.
Git Commit
This command creates the commit and stores it locally. This saves the state and adds it to the repository’s history. The commit will consist of whatever changes («diffs») were made to the staged files since the last commit. It is required to specify a «commit message» explaining why you changed this set of files or what the change accomplishes.
Corra: git commit -m "type message here"
Git Push
Suba (Push) sus cambios locales al repositorio remoto (Cloud)
Corra: git push
Ramas
Branches in Git are similar to parallel worlds. They start off the same, and then they can «branch» out into different varying paths. Consider the Git control flow to look similar to this.
En el ejemplo anterior, main se ramificó (o duplicó) en la rama Característica 1 y alguien revisó la rama, creando una copia local. Luego, alguien confirmó (o subió) sus cambios, fusionándolos en la rama Característica 1. Está «fusionando» los cambios de una rama con otra.
Crear una rama
Corra: git branch branch-name donde branch-name es el nombre de la rama a crear. El nuevo historial de la rama se creará de la rama activa actual.
Acceder a una rama
Una vez que la rama está creada, tienes que entrar a la rama.
Corra: git checkout branch-name donde branch-name es la rama que fue previamente creada.
Fusionar
In scenarios where you want to copy one branches history into another, you can merge them. A merge is done by calling git merge branch-name with branch-name being the name of the branch to merge from. It is automatically merged into the current active branch.
It’s common for a remote repository to contain work (history) that you do not have. Whenever you run git pull, it will attempt to automatically merge those commits into your local copy. That merge may look like the below.
However, in the above example, what if File A was modified by both branch Feature1 and Feature2? This is called a merge conflict. A merge conflict can be resolved by editing the conflicting file. In the example, we would need to edit File A to keep the history or changes that we want. After that has been done, simply re-add, re-commit, and then push your changes.
Resets
Algunas veces, el historial necesita ser reiniciado, o un commit necesita ser deshecho. Esto puede ser realizado de diferentes maneras.
Convirtiendo el Commit
Nota
No puede revertir una fusión, pues git no sabrá que rama u origen deberá escoger.
Para revertir el historial que lleva hacia la ejecución de un commit, corra git revert commit-id. Los IDs de commits pueden ser mostrados usando el comando git log.
Restaurar el Inicio
Advertencia
Restablecer el inicio a la fuerza, es un comando peligroso. Borra permanentemente todo el historial pasado el objetivo. ¡Ha sido advertido!
Corra: git reset --hard commit-id.
Forks
Los forks pueden ser utilizados de manera similar a las ramas. Puede fusionar el upstream (repositorio original) con el origen (forked repositoy).
Clonación de un Repositorio Existente
En el caso de que un repositorio ya esté creado y almacenado en un control remoto, puede clonarlo usando
git clone https://github.com/myrepo.git
where myrepo.git is replaced with your git repo. If you follow this, you can skip to commits.
Actualizar un Fork
Agrege el upstream: git remote add upstream https://github.com/ORIGINAL_OWNER/ORIGINAL_REPOSITORY.git`
Confirme que se ha agregado a través de
git remote -vObtenga los cambios del upstream:
git fetch upstreamFusione los cambios con el inicio:
git merge upstream/upstream-branch-name
Gitignore
Importante
Es extremadamente importante que los equipos no modifiquen el archivo .gitignore que se incluye con su proyecto de robot. Esto puede provocar que la implementación sin conexión no funcione.
Un archivo .gitignore se usa comúnmente como una lista de archivos para no confirmar automáticamente con git add. Cualquier archivo o directorio listado en este archivo no se confirmará. Tampoco aparecerán con git status.
Additional Information can be found here.
Ocultar una Carpeta
Simplemente añada una nueva línea que contenga la carpeta a ocultar, con una diagonal al final
EJ: directory-to-exclude/
Ocultar un Archivo
Añada una nueva línea con el nombre del archivo a ocultar, incluyendo algún directorio pre-pendiente relativo a la raíz del repositorio.
EJ: directory/file-to-hide.txt
EJ: file-to-hide2.txt
Información adicional
Un tutorial mucho más a fondo puede ser encontrado en el sitio web official de git website.
Una guía para corregir los errores comunes puede ser encontrada en el repositorio de `reglas de vuelo<https://github.com/k88hudson/git-flight-rules/blob/master/README.md>`_ repository.