Bir Robot Programı Oluşturmak
Her şey kurulduktan sonra, bir robot programı oluşturmaya hazırız. WPILib, robot programları için çeşitli şablonlarla birlikte gelir. Bu şablonların kullanımı yeni kullanıcılar için şiddetle tavsiye edilir; ancak, ileri düzey kullanıcılar kendi robot kodlarını sıfırdan yazmakta özgürdür.
Temel Sınıf Seçme
WPILib robot programı şablonlarından birini kullanarak bir projeye başlamak için, kullanıcılar önce robotları için bir temel sınıf seçmelidir. Kullanıcılar, robot programının ana akışını kontrol eden birincil Robot sınıfını oluşturmak için bu temel sınıfları alt sınıflandırır. Temel sınıf için üç seçenek mevcuttur:
TimedRobot
Kaynak: Java <https://github.com/wpilibsuite/allwpilib/blob/main/wpilibj/src/main/java/edu/wpi/first/wpilibj/TimedRobot.java> __ - C ++ <https://github.com/wpilibsuite/allwpilib/blob/main/wpilibc/src/main/native/cpp/TimedRobot.cpp> __
The TimedRobot class is the base class recommended for most users. It provides control of the robot program through a collection of init(), periodic(), and exit() methods, which are called by WPILib during specific robot states (e.g. autonomous or teleoperated). During these calls, your code typically polls each input device and acts according to the data it receives. For instance, you would typically determine the position of the joystick and state of the joystick buttons on each call and act accordingly. The TimedRobot class also provides an example of retrieving autonomous routines through SendableChooser (Java/ C++
Not
Bazı bilgilendirici yorumları ve otonom örneği kaldıran bir TimedRobot Skeleton şablonu mevcuttur. Zaten TimedRobot u biliyorsanız bunu kullanabilirsiniz. Aşağıda gösterilen örnek TimedRobot Skeleton içindir.
 7import edu.wpi.first.wpilibj.TimedRobot;
 8
 9/**
10 * The VM is configured to automatically run this class, and to call the functions corresponding to
11 * each mode, as described in the TimedRobot documentation. If you change the name of this class or
12 * the package after creating this project, you must also update the build.gradle file in the
13 * project.
14 */
15public class Robot extends TimedRobot {
16  /**
17   * This function is run when the robot is first started up and should be used for any
18   * initialization code.
19   */
20  @Override
21  public void robotInit() {}
22
23  @Override
24  public void robotPeriodic() {}
25
26  @Override
27  public void autonomousInit() {}
28
29  @Override
30  public void autonomousPeriodic() {}
31
32  @Override
33  public void teleopInit() {}
34
35  @Override
36  public void teleopPeriodic() {}
37
38  @Override
39  public void disabledInit() {}
40
41  @Override
42  public void disabledPeriodic() {}
43
44  @Override
45  public void testInit() {}
46
47  @Override
48  public void testPeriodic() {}
49
50  @Override
51  public void simulationInit() {}
52
53  @Override
54  public void simulationPeriodic() {}
55}
 5#include "Robot.h"
 6
 7void Robot::RobotInit() {}
 8void Robot::RobotPeriodic() {}
 9
10void Robot::AutonomousInit() {}
11void Robot::AutonomousPeriodic() {}
12
13void Robot::TeleopInit() {}
14void Robot::TeleopPeriodic() {}
15
16void Robot::DisabledInit() {}
17void Robot::DisabledPeriodic() {}
18
19void Robot::TestInit() {}
20void Robot::TestPeriodic() {}
21
22void Robot::SimulationInit() {}
23void Robot::SimulationPeriodic() {}
24
25#ifndef RUNNING_FRC_TESTS
26int main() {
27  return frc::StartRobot<Robot>();
28}
29#endif
Periyodik yöntemler varsayılan olarak her 20 ms’de bir çağrılır. Bu, istenen yeni güncelleme oranıyla üst sınıf kurucusunu çağırarak değiştirilebilir.
Tehlike
Changing your robot rate can cause some unintended behavior (loop overruns). Teams can also use Notifiers to schedule methods at a custom rate.
public Robot() {
  super(0.03); // Periodic methods will now be called every 30 ms.
}
Robot() : frc::TimedRobot(30_ms) {}
RobotBase
Kaynak: Java <https://github.com/wpilibsuite/allwpilib/blob/main/wpilibj/src/main/java/edu/wpi/first/wpilibj/RobotBase.java> __ - C ++ <https://github.com/wpilibsuite/allwpilib/blob/main/wpilibc/src/main/native/cppcs/RobotBase.cpp> __
The RobotBase class is the most minimal base-class offered, and is generally not recommended for direct use. No robot control flow is handled for the user; everything must be written from scratch inside the startCompetition() method. The template by default showcases how to process the different operation modes (teleop, auto, etc).
Not
Boş bir startCompetition() metodu sunan bir RobotBase Skeleton şablonu mevcuttur.
Command Robot-Komut Robotu
The Command Robot framework adds to the basic functionality of a Timed Robot by automatically polling inputs and converting the raw input data into events. These events are tied to user code, which is executed when the event is triggered. For instance, when a button is pressed, code tied to the pressing of that button is automatically called and it is not necessary to poll or keep track of the state of that button directly. The Command Robot framework makes it easier to write compact easy-to-read code with complex behavior, but requires an additional up-front time investment from a programmer in order to understand how the Command Robot framework works.
Teams using Command Robot should see the Command-Based Programming Tutorial.
Romi
Romi kullanan takımlar Romi - Timed veya Romi - Command Bot şablonunu kullanmalıdır.
Romi - Zamanlı
Romi - Timed şablonu, bir arcadeDrive (double xaxisSpeed, double zaxisRotate) metodunu ortaya çıkaran bir RomiDrivetrain sınıfı sağlar. Bu arcadeDrive işlevini beslemek kullanıcıya bağlıdır.
Bu sınıf ayrıca Romi’nin yerleşik kodlayıcılarının alınması ve sıfırlanması için işlevler de sağlar.
Romi - Komut Robotu
Romi - Command Bot şablonu, bir arcadeDrive (double xaxisSpeed, double zaxisRotate) metodunu ortaya çıkaran bir RomiDrivetrain alt sistemi sağlar. Bu arcadeDrive işlevini beslemek kullanıcıya bağlıdır.
Bu alt sistem aynı zamanda Romi’nin yerleşik kodlayıcılarının alınması ve sıfırlanması için işlevler de sağlar.
Temel Sınıf Kullanmama
İstenirse, kullanıcılar bir temel sınıfı tamamen çıkarabilir ve programlarını başka herhangi bir programda olduğu gibi basitçe main() yöntemine yazabilirler. Bu kesinlikle tavsiye edilmez - kullanıcılar robot kodlarını yazarken “tekerleği yeniden icat etmemelidir” - ancak program akışları üzerinde mutlak kontrole sahip olmak isteyenler için desteklenir.
Uyarı
Kullanıcılar, ne yaptıklarından kesinlikle emin olmadıkları sürece bir robot programının main() yöntemini değiştirmemelidir.
Yeni bir WPILib Projesi Oluşturma
Once we’ve decided on a base class, we can create our new robot project. Bring up the Visual Studio Code command palette with Ctrl+Shift+P. Then, type “WPILib” into the prompt. Since all WPILib commands start with “WPILib”, this will bring up the list of WPILib-specific VS Code commands. Now, select the Create a new project command:

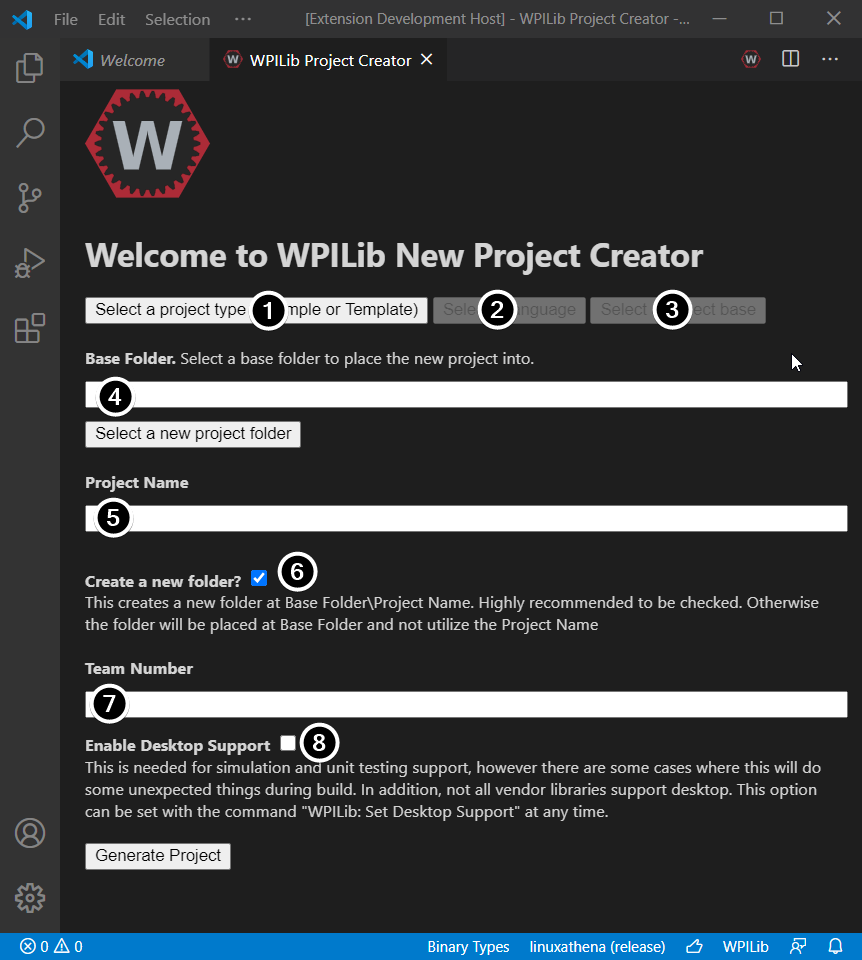
Bu, “New Project Creator Window-Yeni Proje Oluşturma Penceresi:” getirecektir:

Yeni Proje Oluşturma Penceresinin öğeleri aşağıda açıklanmıştır:
Project Type -Proje Türü: Oluşturmak istediğimiz proje türü. Bu örnek bir proje veya WPILib tarafından sağlanan proje şablonlarından biri olabilir. Robot temel sınıflarının her biri için şablonlar mevcuttur. Ek olarak, Command-based projeleri için bir şablon mevcuttur; bu projeler
TimedRobottemel sınıfı üzerine inşa edilmiştir, ancak bir dizi ek özellik içerir - bu tür robot programı yeni ekipler için şiddetle tavsiye edilir.Language -Dil: Bu proje için kullanılacak dildir (C++ veya Java).
** Base Folder-Temel Klasör **: Bu bir şablon projeyse, bu kullanılacak şablonun türünü belirtir.
Project Location -Proje Konumu: Robot projesinin konumlandırılacağı klasörü belirler.
Project Name -Proje Adı: Robot projesinin adı. Bu ayrıca Create New Folder -Yeni Klasör Oluştur kutusu işaretlendiğinde proje klasörünün verileceği adı da belirtir.
** Create a New Folder-Yeni Klasör Oluştur **: Bu işaretlenirse, projeyi önceden belirtilen klasör içinde tutmak için yeni bir klasör oluşturulur. *not-işaretli değilse *, proje doğrudan önceden belirtilen klasörde yer alacaktır. Klasör boş değilse ve bu kontrol edilmezse bir hata atılacaktır.
Team Number -Takım Numarası: Proje içindeki paket isimleri için ve kodu yüklerken robotu bulmak için kullanılacak proje takım numarası.
**Enable Desktop Support-Masaüstü Desteğini Etkinleştir **: Birim testi ve simülasyonu etkinleştirir. WPILib bunu desteklerken, üçüncü taraf yazılım kitaplıkları desteklemeyebilir. Kitaplıklar masaüstünü desteklemiyorsa, kodunuz derlenmeyebilir veya çökebilir. Birim testi veya simülasyon gerekmedikçe ve tüm kitaplıklar bunu desteklemedikçe, işaretlenmeden bırakılmalıdır.
Yukarıdakilerin tümü yapılandırıldıktan sonra, “Generate Project -Proje Oluştur” u tıklayın ve robot projesi oluşturulacaktır.
Not
Proje oluşturmadaki herhangi bir hata, ekranın sağ alt köşesinde görünecektir.
Uyarı
Creating projects on OneDrive is not supported as OneDrive’s caching interferes with the build system. Some Windows installations put the Documents and Desktop folders on OneDrive by default.
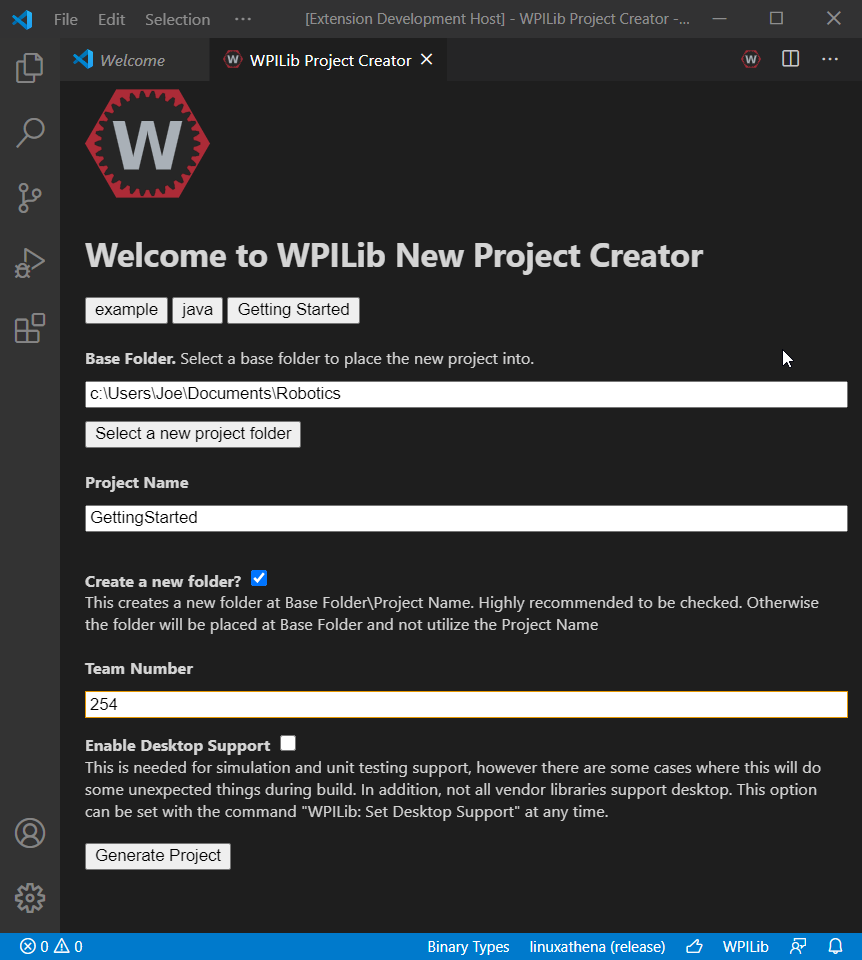
Tüm seçenekler seçildikten sonra bir örnek aşağıda gösterilmiştir.

Yeni Projeyi Açmak
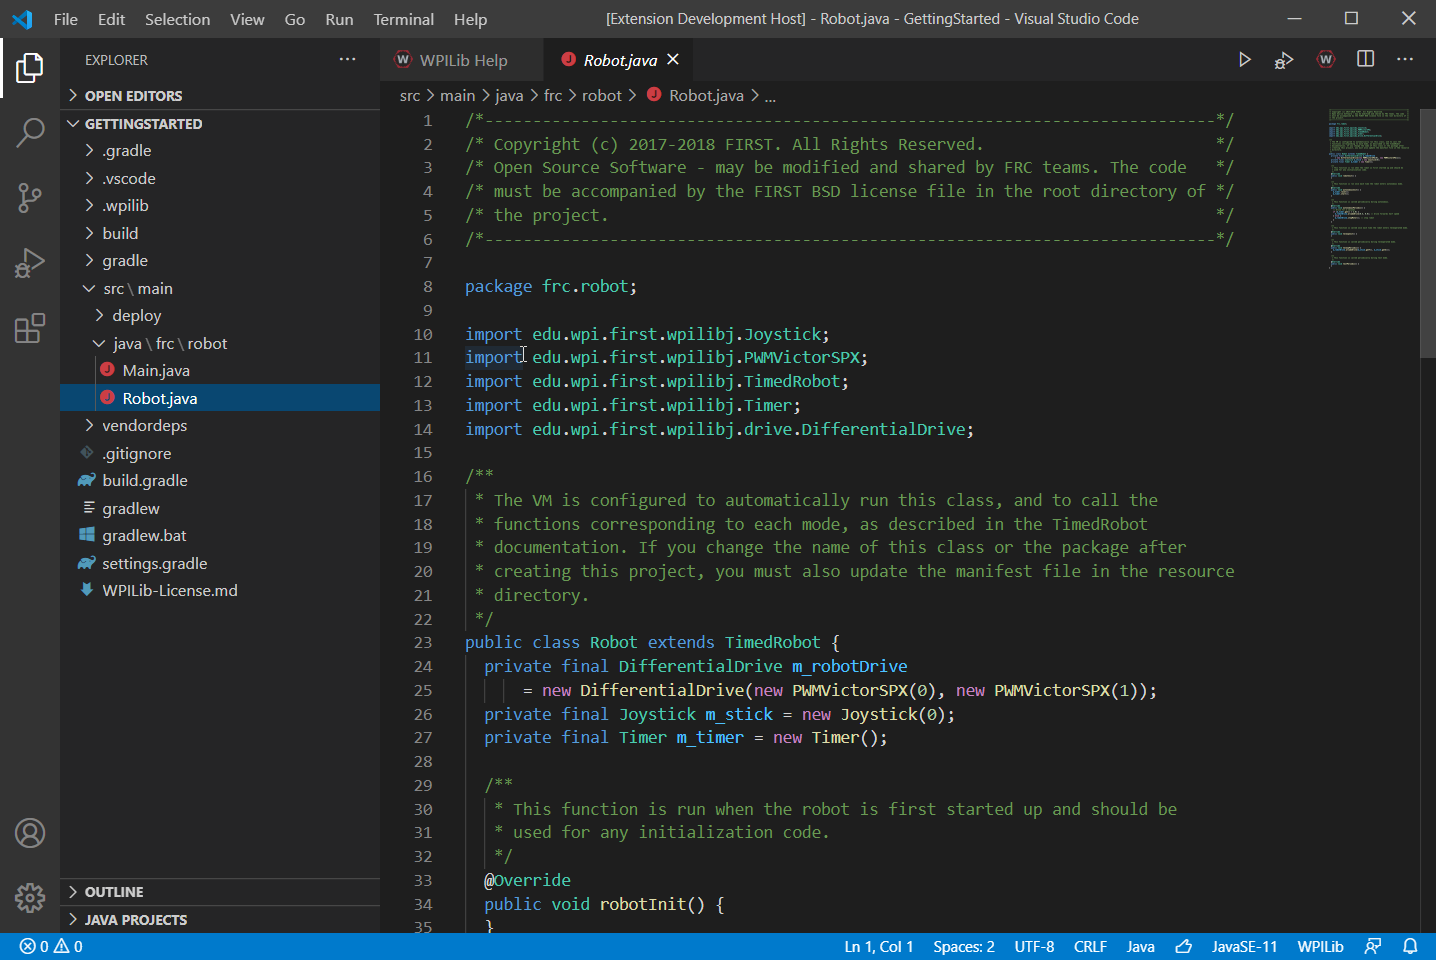
After successfully creating your project, VS Code will give the option of opening the project as shown below. We can choose to do that now or later by typing Ctrl+K then Ctrl+O (or just Command+O on macOS) and select the folder where we saved our project.

Açıldıktan sonra solda proje hiyerarşisini göreceğiz. Dosyaya çift tıklamak o dosyayı düzenleyicide açacaktır.

C++ Yapılandırmaları (Yalnızca C++)
C ++ projeleri için IntelliSense’i kurmak için bir adım daha vardır. Ne zaman bir proje açsak, sağ alt köşede C ++ yapılandırmalarını yenilememizi isteyen bir pencere açmalıyız. IntelliSense’i kurmak için “Yes-Evet” i tıklayın.
