Reading Array Values Published by NetworkTables
This article describes how to read values published by NetworkTables using a program running on the robot. This is useful when using computer vision where the images are processed on your driver station laptop and the results stored into NetworkTables possibly using a separate vision processor like a raspberry pi, or a tool on the robot like a python program to do the image processing.
Çoğunlukla değerler, hedefler veya oyun parçaları gibi bir veya daha fazla ilgi alanı içindir ve birden çok örnek döndürülür. Aşağıdaki örnekte, görüntü işlemcisi tarafından birkaç x, y, genişlik, yükseklik ve alan döndürülür ve robot programı, daha sonraki işlemlerle döndürülen değerlerden hangisinin ilgi çekici olduğunu belirleyebilir.
Verify the NetworkTables Topics Being Published

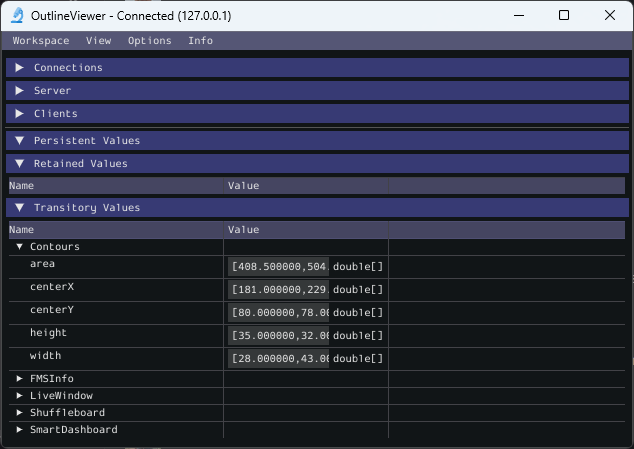
You can verify the names of the NetworkTables topics used for publishing the values by using the Outline Viewer application. It is a C++ program in your user directory in the wpilib/<YEAR>/tools folder. The application is started by selecting the “WPILib” menu in Visual Studio Code then Start Tool then “OutlineViewer”. In this example, with the image processing program running (GRIP) you can see the values being put into NetworkTables.
In this case the values are stored in a table called GRIP and a sub-table called myContoursReport. You can see that the values are in brackets and there are 2 values in this case for each topic. The NetworkTables topic names are centerX, centerY, area, height and width.
Aşağıdaki örneklerin her ikisi de, sadece NetworkTables’ın kullanımını gösteren, son derece basitleştirilmiş programlardır. Tüm kod robotInit() yöntemindedir, bu nedenle yalnızca program başladığında çalıştırılır. Programlarınızda, otonom veya teleop dönemlerinde robotu bir komutta veya bir kontrol döngüsünde hangi yöne hedefleyeceğinizi değerlendiren koddaki değerleri büyük olasılıkla alırsınız.
Writing a Program to Access the Topics
DoubleArraySubscriber areasSub;

@Override
public void robotInit() {
  NetworkTable table = NetworkTableInstance.getDefault().getTable("GRIP/mycontoursReport");
  areasSub = table.getDoubleArrayTopic("area").subscribe(new double[] {});
}

@Override
public void teleopPeriodic() {
    double[] areas = areasSub.get();

    System.out.print("areas: " );

    for (double area : areas) {
      System.out.print(area + " ");
    }

    System.out.println();
}
nt::DoubleArraySubscriber areasSub;

void Robot::RobotInit() override {
  auto table = nt::NetworkTableInstance::GetDefault().GetTable("GRIP/myContoursReport");
  areasSub = table->GetDoubleArrayTopic("area").Subscribe({});
}

void Robot::TeleopPeriodic() override {
  std::cout << "Areas: ";

  std::vector<double> arr = areasSub.Get();

  for (double val : arr) {
    std::cout << val << " ";
  }

  std::cout << std::endl;
}
def robotInit(self):
    table = ntcore.NetworkTableInstance.getDefault().getTable("GRIP/mycontoursReport")
    self.areasSub = table.getDoubleArrayTopic("area").subscribe([])

def teleopPeriodic(self):
    areas = self.areasSub.get()
    print("Areas:", areas)
Değerleri alma ve bu programda yazdırmanın adımları şunlardır:
Değerlere sahip alt tablo örneğini tutacak tablo değişkenini bildirin.
Daha sonra değerleri almak için kullanılabilmesi için alt tablo örneğini başlatın.
Read the array of values from NetworkTables. In the case of a communicating programs, it’s possible that the program producing the output being read here might not yet be available when the robot program starts up. To avoid issues of the data not being ready, a default array of values is supplied. This default value will be returned if the NetworkTables topic hasn’t yet been published. This code will loop over the value of areas every 20ms.
Program Output

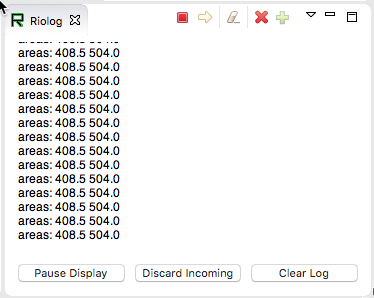
Bu durumda program yalnızca alan dizisine bakmaktadır, ancak gerçek bir örnekte tüm değerler büyük olasılıkla kullanılacaktır. Riolog’u VS Code veya Driver Station günlüğünde kullanarak, değerleri alınırken görebilirsiniz. Bu program, alanların değişmemesi için örnek bir statik görüntü kullanıyor, ancak robotunuzdaki bir kamera ile değerlerin sürekli değişeceğini hayal edebilirsiniz.