Romi’yi Programlamak
Romi için bir program yazmak, normal bir FRC robotu için bir program yazmaya çok benzer. Aslında, tüm aynı araçlar (Visual Studio Code, Driver Station, SmartDashboard, vb.) Romi ile kullanılabilir.
Bir Romi Programı Oluşturmak
Creating a new program for a Romi is like creating a normal FRC program, similar to the Zero To Robot programming steps.
WPILib comes with two templates for Romi projects, including one based on TimedRobot, and a Command-Based project template. Additionally, an example project is provided which showcases some of the built-in functionality of the Romi. This article will walk through creating a project from this example.
Not
In order to program the Romi using C++, a compatible C++ desktop compiler must be installed. See Robot Simulation - Additional C++ Dependency.
Yeni bir WPILib Romi Projesi Oluşturma
Visual Studio Code komut paletini şu şekilde getirin Ctrl+Shift+P ve komut istemine ” New project-Yeni proje” yazın. “Create a new project-Yeni proje oluştur” komutunu seçin:

Bu, “New Project Creator Window-Yeni Proje Oluşturucu Penceresini” getirecektir. Buradan, “Select a project type-Bir proje türü seçin (Örnek veya Şablon) seçeneğini tıklayın ve beliren istemden “Example-Örnek “i seçin:

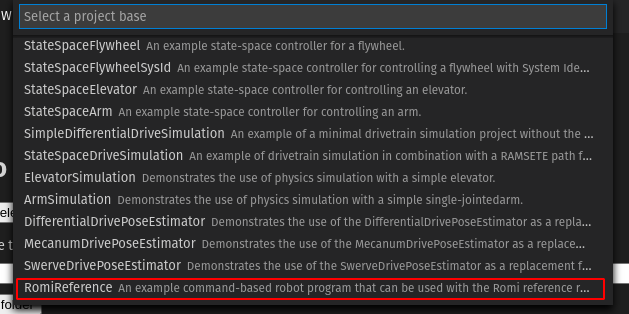
Ardından, bir örnek listesi görünecektir. “RomiReference” örneğini bulmak için listede ilerleyin:

“New Project Creator-Yeni Proje Oluşturucu” daki kalan alanları doldurun ve yeni robot projesini oluşturmak için “Generate Project-Proje Oluştur” u tıklayın.
Bir Romi Programı Çalıştırmak
Once the robot project is generated, it is essentially ready to run. The project has a pre-built Drivetrain class and associated default command that lets you drive the Romi around using a joystick.
One aspect where a Romi project differs from a regular FRC robot project is that the code is not deployed directly to the Romi. Instead, a Romi project runs on your development computer and leverages the WPILib simulation framework to communicate with the Romi robot.
To run a Romi program, first, ensure that your Romi is powered on. Next, connect to the WPILibPi-<number> WiFi network broadcast by the Romi. If you changed the Romi network settings (for example, to connect it to your own WiFi network) you may change the IP address that your program uses to connect to the Romi. To do this, open the build.gradle file and update the wpi.sim.envVar line to the appropriate IP address.
43//Sets the websocket client remote host.
44wpi.sim.envVar("HALSIMWS_HOST", "10.0.0.2")
45wpi.sim.addWebsocketsServer().defaultEnabled = true
46wpi.sim.addWebsocketsClient().defaultEnabled = true
Now to start your Romi robot code, open the WPILib Command Palette (type Ctrl+Shift+P) and select “Simulate Robot Code”, or press F5.

Her şey yolunda giderse, konsol çıktısında “HALSimWS:WebSocket Connected” yazan bir satır görmelisiniz:

Romi kodunuz şimdi çalışıyor!