Introduction to Robot Simulation
Often a team may want to test their code without having an actual robot available. WPILib provides teams with the ability to simulate various robot features using simple gradle commands.
Use of the Desktop Simulator requires Desktop Support to be enabled. This can be done by checking the ”Enable Desktop Support Checkbox“ when creating your robot project or by running ”WPILib: Change Desktop Support Enabled Setting“ from the Visual Studio Code command palette.


Desktop support can also be enabled by manually editing your build.gradle file located at the root of your robot project. Simply change includeDesktopSupport = false to includeDesktopSupport = true
חשוב
It is important to note that enabling desktop/simulation support can have unintended consequences. Not all vendors will support this option, and code that uses their libraries may even crash when attempting to run simulation!
If at any point in time you want to disable Desktop Support, simply re-run the ”WPILib: Change Desktop Support Enabled Setting“ from the command palette or change includeDesktopSupport to false in build.gradle.
הערה
C++ robot simulation requires that a native compiler to be installed. For Windows, this would be Visual Studio 2022 version 17.9 or later (not VS Code), macOS requires Xcode 14 or later, and Linux (Ubuntu) requires the build-essential package.
Ensure the Desktop Development with C++ option is checked in the Visual Studio installer for simulation support.

Running Robot Simulation
Basic robot simulation can be run using VS Code. This can be done by using VS Code’s command palette WPILib: Simulate Robot Code as shown below.


The Sim GUI option will be selected by default. This will launch the Simulation GUI. You can also launch simulation without a GUI by unchecking Sim GUI in which case your console output in Visual Studio Code should look like the below.
********** Robot program starting **********
Default disabledInit() method... Override me!
Default disabledPeriodic() method... Override me!
Default robotPeriodic() method... Override me!
If you would would like to prevent the pop up and only use build.gradle to configure your simulation settings you can add the following in your vscode settings.json file.
"wpilib.skipSelectSimulateExtension": true
אזהרה
You may see a run button next to the WPILib button. This button does not set up simulation appropriately and should not be used. Instead, the menu item shown above WPILib: Simulate Robot Code should be used.

הערה
Simulation can also be run outside of VS Code using ./gradlew simulateJava for Java or ./gradlew simulateNative for C++.
הערה
Some vendors support attaching hardware to your PC and using the hardware in desktop simulation (e.g. CANivore). See vendor documentation for more information about the command WPILib: Hardware Sim Robot Code.
GUI simulation support is installed by default when you install RobotPy.
There is a robotpy subcommand that you can execute to run your code in simulation:
py -3 -m robotpy sim
python3 -m robotpy sim
python3 -m robotpy sim
Running Robot Dashboards
Shuffleboard, SmartDashboard, Glass, and AdvantageScope can be used with WPILib simulation when they are configured to connect to the local computer (i.e. localhost).
Shuffleboard
Shuffleboard is automatically configured to look for a NetworkTables instance from the robotRIO but not from other sources. To connect to a simulation, open Shuffleboard preferences from the File menu and select NetworkTables under Plugins on the left navigation bar. In the Server field, type in the IP address or hostname of the NetworkTables host. For a standard simulation configuration, use localhost.

SmartDashboard
SmartDashboard is automatically configured to look for a NetworkTables instance from the roboRIO, but not from other sources. To connect to a simulation, open SmartDashboard preferences under the File menu and in the Team Number field, enter the IP address or hostname of the NetworkTables host. For a standard simulation configuration, use localhost.

Glass
Glass is automatically configured to look for a NetworkTables instance from the roboRIO, but not from other sources. To connect to a simulation, open NetworkTables Settings under the NetworkTables menu and in the Team/IP field, enter the IP address or hostname of the NetworkTables host. For a standard simulation configuration, use localhost.

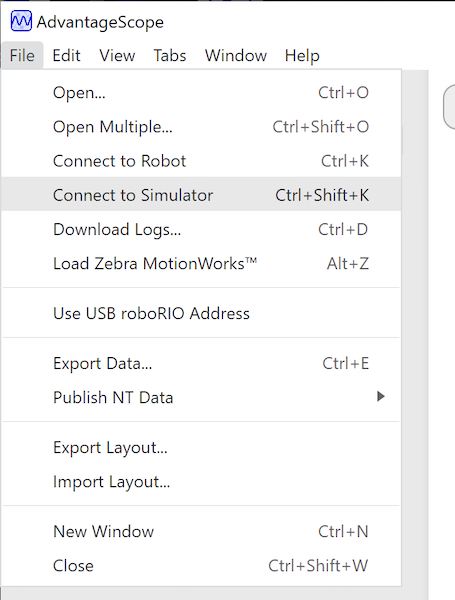
AdvantageScope
No configuration is required to connect to a NetworkTables instance running on the local computer. To connect to a simulation, click Connect to Simulator under the File menu or press Ctrl+Shift+K.