XRP Hardware, Assembly and Imaging
To get started with the XRP, you will need to have the necessary hardware.
XRP Kit from SparkFun or from DigiKey - Available at a discount for educational institutions or FIRST teams. See individual vendors for details.
Micro-USB cable - Ensure that this is a data cable
4 AA batteries - Rechargeable (example) is best (don’t forget the charger)
הרכבה
הערה
See the assembly instructions on the XRP User Guide.
You should follow the instructions up to and including the point where the XRP arm is mounted to the servo.
Imaging your XRP
The XRP uses a Raspberry Pi Pico W as its main processor. A special firmware will need to be installed so that the robot operates properly.
הורדה
The XRP firmware must be downloaded and written to the Pico W. Click on Assets at the bottom of the description to see the available image files:
צריבה
To image the XRP, perform the following steps:
Extract the contents of the firmware ZIP file. You should end up with a
.uf2file.Plug the XRP into your computer with a Micro-USB cable. You should see a red power LED that lights up.
While holding the
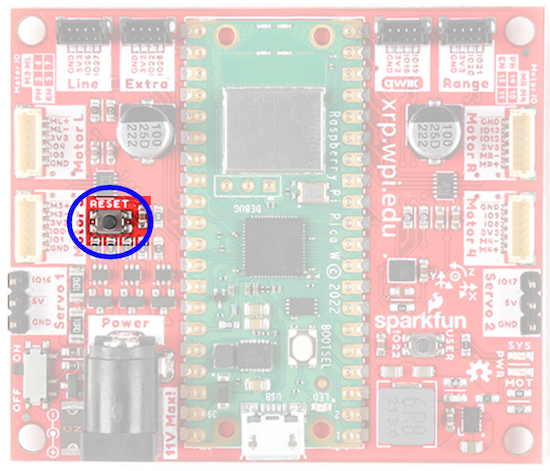
BOOTSELbutton (the white button on the green Pico W, near the USB connector), quickly press the reset button (circled below), and then release theBOOTSELbutton.

The board will temporarily disconnect from your computer, and then reconnect as a USB storage device named
RPI-RP2.Drag the
.uf2firmware file into theRPI-RP2drive, and it will automatically update the firmware.Once complete, the
RPI-RP2USB storage device will disconnect. At this point, you can disconnect the XRP board from your computer and run it off battery power.
First Boot
Perform the following steps to get your XRP ready for use:
Ensure that you have 4 AA batteries installed
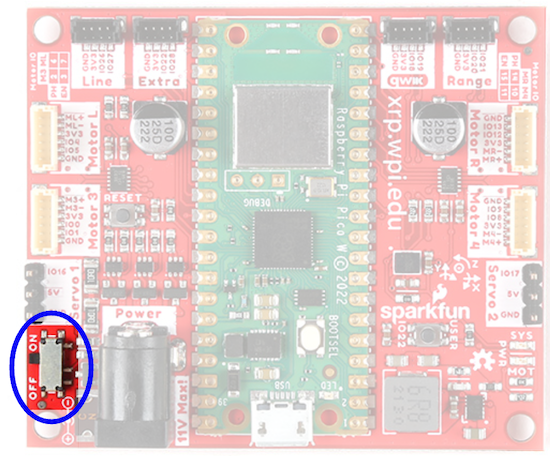
Turn the XRP on by sliding the power switch (circled below) on the XRP board to the on position. A red power LED will turn on.

Using your computer, connect to the XRP WiFi network using the SSID
XRP-<IDENT>(where<IDENT>is based on the unique ID of the Pico W) with the WPA2 passphrasexrp-wpilib.
הערה
If powering on the XRP in an environment with multiple other XRPs, the SSID can also be found by connecting the XRP to a computer, navigating to the USB storage device (PICODISK) that appears and opening the xrp-status.txt file.
Open a web browser and connect to the web UI at
http://192.168.42.1:5000. If the page loads, you have established connectivity with the XRP.
הערה
More information about the Web UI and configuration can be found in the Web UI section.