Robotunuzu Sürmek için WPILib Sınıflarının Kullanımı
WPILib, robotunuzun daha kısa sürede işlevsel hale getirmeye yardımcı birçok sınıf içermektedir.
Standart aktarma sistemleri
Differential Drive Robots
Bu sürüş tabanları tipik olarak her tarafta iki veya daha fazla sıralı çekiş veya çok yönlü tekerleklere (ör., 6WD veya 8WD) sahiptir ve diğer adlarıyla “skid-steer”, “tank drive” veya “West Coast Drive” olarak da bilinmektedir. Parça kiti aktarma sistemi, diferansiyel sürücüye bir örnektir. Bu aktarma sistemleri ileri/geri hareket kabiliyetine sahip ve her iki tarafı zıt yönlerde hareket ettirip, tekerleklerin yana doğru kaymasına sebep olarak dönüş yapabilmektedir. Bu aktarma sistemleri, yanlamasına öteleme hareketine olanak tanımamaktadır.
Mecanum Sürüşü
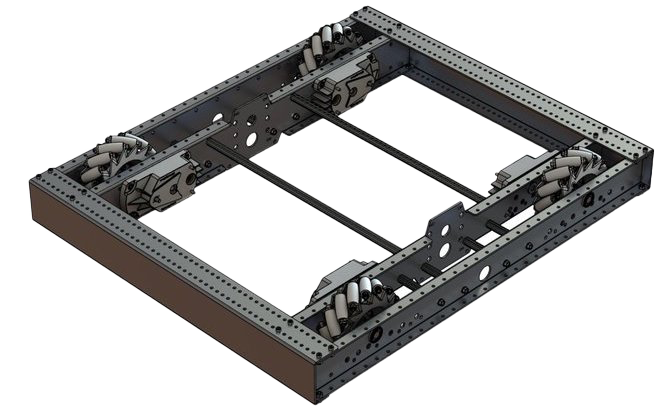
Mecanum drive is a method of driving using specially designed wheels that allow the robot to drive in any direction without changing the orientation of the robot. A robot with a conventional drivetrain (all wheels pointing in the same direction) must turn in the direction it needs to drive. A mecanum robot can move in any direction without first turning and is called a holonomic drive. The wheels (shown on this robot) have rollers that cause the forces from driving to be applied at a 45 degree angle rather than straight forward as in the case of a conventional drive.
When viewed from the top, the rollers on a mecanum drivetrain should form an ‘X’ pattern. This results in the force vectors (when driving the wheel forward) on the front two wheels pointing forward and inward and the rear two wheels pointing forward and outward. By spinning the wheels in different directions, various components of the force vectors cancel out, resulting in the desired robot movement. A quick chart of different movements has been provided below, drawing out the force vectors for each of these motions may help in understanding how these drivetrains work. By varying the speeds of the wheels in addition to the direction, movements can be combined resulting in translation in any direction and rotation, simultaneously.
Drive Class Conventions
Motor Inversion
It is the responsibility of the user to manage proper inversions for their drivetrain. Users can invert motors by calling setInverted()/SetInverted() on their motor objects. Typically for differential drive trains, one side must be inverted to avoid spinning in circles, since the forward direction of each side of the tank drive is opposite of each other.
PWMSparkMax m_motorRight = new PWMSparkMax(0);

public Robot() {
   m_motorRight.setInverted(true);
}
frc::PWMSparkMax m_motorLeft{0};
public:
 Robot::Robot() {
   m_motorRight.SetInverted(true);
 }
def robotInit(self):
    self.motorRight = wpilib.PWMSparkMax(0)
    self.motorRight.setInverted(True)
Squaring Inputs
When driving robots, it is often desirable to manipulate the joystick inputs such that the robot has finer control at low speeds while still using the full output range. One way to accomplish this is by squaring the joystick input, then reapplying the sign. By default the Differential Drive class will square the inputs. If this is not desired (e.g. if passing values in from a PIDController), use one of the drive methods with the squaredInputs parameter and set it to false.
Input Deadband
Varsayılan olarak Diferansiyel Drive 0,02’lik bir ölü bant uygulamaktadır. Diğer bir deyişle (yukarıda açıklandığı üzere herhangi bir kareleme işleminden sonra) 0,02’den aşağı bir değere sahip giriş değerleri 0 olarak ayarlanacaktır. Çoğu durumda bu küçük girdiler eksik bir kumanda kolu merkezlemesinden kaynaklanmakta olup kendi başlarına aktarım sisteminin hareketine sebep olmak için yeterli değillerdir, ölü bant bu düşük değerlerin aktarma sistemine uygulanmasıyla ortaya çıkabilecek gereksiz motor ısınmasının önüne geçmektedir. Ölü bantı değiştirmek için setDeadband() metodunu kullanınız.
Maximum Output
Bazen aktarma sistemi robotu çok hızlı sürdüğü için sürücüler sistemin çıktısını sınırlamak isteyebilmektedir. Bu işlem setMaxOutput() metodu ile kolayca gerçekleştirilebilmektedir. Bu maksimum çıktı, ölü pant ve karelenmiş girdiler gibi önceki sürüş fonksiyonlarının sonuçlarıyla çarpılmaktadır.
Motor Safety
Motor Safety is a mechanism in WPILib that takes the concept of a watchdog and breaks it out into one watchdog (Motor Safety timer) for each individual actuator. Note that this protection mechanism is in addition to the System Watchdog which is controlled by the Network Communications code and the FPGA and will disable all actuator outputs if it does not receive a valid data packet for 125ms.
Motor Güvenliği düzeneğinin amacı, bir güvenlik zamanlayıcısınınkiyle aynıdır: Kodun kilitlendiği ve aktüatör çıktısının doğru bir şekilde güncellenmediği durumlarda kendilerine, başkalarına veya çevreye zarar verebilecek düzenekleri etkisiz hale getirmek. Nerede gerekli olup nerede olmadığını uygun bir şekilde belirleyebilmeniz için Motor Güvenliği bu kavramı aktüatör başı bir şekilde gerçekleştirmektedir. Aktarma sistemleri ve kollar motor güvenliğinin etkinleştirilmesi gereken düzeneklere örnek olarak gösterilebilmektedir. Bu sistemler belirli bir değerde takılı kalırsa, çevrelerine veya kendilerine zarar verebilmektedir. Bir atıcının döner volanı motor güvenliğine ihtiyaç duymayabilen bir düzeneğe örnek olarak gösterilebilmektedir. Bu düzenek belrili bir değerde takılı kalırsa, sadece robot etkisiz hale gelinceye kadar dönmeye devam edecektir. Varsayılan olarak Motor Güvenliği DifferentialDrive ve MecanumDrive nesnelerinde etkin, diğer tüm motor kontrolörleri ve servolar içinse devre dışıdır.
The Motor Safety feature operates by maintaining a timer that tracks how long it has been since the feed() method has been called for that actuator. Code in the Driver Station class initiates a comparison of these timers to the timeout values for any actuator with safety enabled every 5 received packets (100ms nominal). The set() methods of each motor controller class and the set() and setAngle() methods of the servo class call feed() to indicate that the output of the actuator has been updated.
The Motor Safety interface of motor controllers can be interacted with by the user using the following methods:
m_motorRight.setSafetyEnabled(true);
m_motorRight.setSafetyEnabled(false);
m_motorRight.setExpiration(.1);
m_motorRight.feed()
m_motorRight->SetSafetyEnabled(true);
m_motorRight->SetSafetyEnabled(false);
m_motorRight->SetExpiration(.1);
m_motorRight->Feed();
m_motorRight.setSafetyEnabled(True)
m_motorRight.setSafetyEnabled(False)
m_motorRight.setExpiration(.1)
m_motorRight.feed()
Varsayılan olarak tüm Drive nesneleri, Motor Güvenliğini etkinleştirmektedir. Düzenek ve programın yapısına bağlı olarak, (saniye biriminde) motor güvenliği zaman aşımını yapılandırmak isteyebilirsiniz. Zaman aşımı süresi aktüatör başına gerçekleştirilen bir yapılandırmadır, genel bir ayar değildir. Varsayılan (ve faydalı en düşük) değer 100ms’dir.
Eksen Düzenleri
Sürüş sınırları (dünya çerçevesinde dış bir referans olarak Kuzey-Batı-Yukarı) NWU eksen yönlerini kullanmaktadır. Pozitif X ekseni ileri, pozitif Y ekseni sola, pozitif Z ekseiyse yukarı bakmaktadır. Bu durum için NWU kullanmamızın sebebi kütüphanenin geri kalanının, ve genel olarak matematiğin, NWU eksen düzeni kullanıyor olmasıdır.
Kumanda kolları; pozitif X ekseni ileri, pozitif Y ekseni sağa, pozitif Z ekseniyse aşağıya bakan NED (Kuzey-Doğu-Aşağı) yönünü izlemektedir. Fakat eksen değerlerinin öteleme değil, ilgili eksenler etrafında dönme olduğu unutlmamalıdır. Tüm eksenler size bakacak şekilde görüntülendiğinde CCW pozitif bir değerken CW negatif bir değerdir. Kumanda kolunun sağa doğru oynatmak Y ekseni etrafında gerçekleşen bir CW dönmesidir, yani elde edilen değer negatif olacaktır. Kolunun ileri doğru oynatmak X ekseni etrafında gerçekleşen bir CCW dönmesidir, yani elde edilen değer pozitif olacaktır.
Not
Eksen düzenleri ve koordinat düzlemlerine dair daha fazla bilgi için bkz. Coordinate System bölümü.
Diferansiyel Sürüşe sahip robotların yönetimi için DifferentialDrive sınıfını kullanmak
Not
WPILib, en yaygın aktarma sistemi yapılandırmalı (diferansiyel ve mecanum) için ayrı Robot Drive sınıfları sağlamaktadır. DifferentialDrive sınıfı diferansiyel aktarma sistemi yapılandırmasını yönetmektedir. BU sürüş tabanları yaygın bir şekilde taraf başına iki veya daha fazla sıralı çekiş veya çok yönlü teker (6W veya 8W) içermekte ve “skid-steer”, “tank drive” veya “West Coast Drive” (WCD) gibi isimlerle de anılabilmektedir. Parça Kiti aktarma sistemi diferansiyel sürüş için bir örnek olarak gösterilebilmektedir. Aşağıdaki yazıda açıklandığı üzere, sürüşü yönetmek için kullanılabilen 3 farklı tarz (“Tank”, “Arcade” veya “Curvature”) bulunmaktadır.
DifferentialDrive is a method provided for the control of “skid-steer” or “West Coast” drivetrains, such as the Kit of Parts chassis. Instantiating a DifferentialDrive is as simple as so:
public class Robot extends TimedRobot {
  private DifferentialDrive m_robotDrive;
  private final PWMSparkMax m_leftMotor = new PWMSparkMax(0);
  private final PWMSparkMax m_rightMotor = new PWMSparkMax(1);

  @Override
  public void robotInit() {
    // We need to invert one side of the drivetrain so that positive voltages
    // result in both sides moving forward. Depending on how your robot's
    // gearbox is constructed, you might have to invert the left side instead.
    m_rightMotor.setInverted(true);

    m_robotDrive = new DifferentialDrive(m_leftMotor::set, m_rightMotor::set);
  }
  frc::PWMSparkMax m_leftMotor{0};
  frc::PWMSparkMax m_rightMotor{1};
  frc::DifferentialDrive m_robotDrive{
      [&](double output) { m_leftMotor.Set(output); },
      [&](double output) { m_rightMotor.Set(output); }};
  void RobotInit() override {
    // We need to invert one side of the drivetrain so that positive voltages
    // result in both sides moving forward. Depending on how your robot's
    // gearbox is constructed, you might have to invert the left side instead.
    m_rightMotor.SetInverted(true);
  }
    def robotInit(self):
        """Robot initialization function"""

        leftMotor = wpilib.PWMSparkMax(0)
        rightMotor = wpilib.PWMSparkMax(1)
        self.robotDrive = wpilib.drive.DifferentialDrive(leftMotor, rightMotor)
        # We need to invert one side of the drivetrain so that positive voltages
        # result in both sides moving forward. Depending on how your robot's
        # gearbox is constructed, you might have to invert the left side instead.
        rightMotor.setInverted(True)
Çok Motorlu DifferentialDrive
Many FRC® drivetrains have more than 1 motor on each side. Classes derived from PWMMotorController (Java / C++ / Python) have an addFollower method so that multiple follower motor controllers can be updated when the leader motor controller is commanded. CAN motor controllers have similar features, review the vendor’s documentation to see how to use them. The examples below show a 4 motor (2 per side) drivetrain. To extend to more motors, simply create the additional controllers and use additional addFollower calls.
Sınıf değişkenleri (örn. Robot.java veya Alt sistem) aşağıdaki şekildedir:
  // The motors on the left side of the drive.
  private final PWMSparkMax m_leftLeader = new PWMSparkMax(DriveConstants.kLeftMotor1Port);
  private final PWMSparkMax m_leftFollower = new PWMSparkMax(DriveConstants.kLeftMotor2Port);

  // The motors on the right side of the drive.
  private final PWMSparkMax m_rightLeader = new PWMSparkMax(DriveConstants.kRightMotor1Port);
  private final PWMSparkMax m_rightFollower = new PWMSparkMax(DriveConstants.kRightMotor2Port);
Robot veya Alt sistem constructor’ında aşağıdaki şekildedir:
    m_leftLeader.addFollower(m_leftFollower);
    m_rightLeader.addFollower(m_rightFollower);

    // We need to invert one side of the drivetrain so that positive voltages
    // result in both sides moving forward. Depending on how your robot's
    // gearbox is constructed, you might have to invert the left side instead.
    m_rightLeader.setInverted(true);
 private:
  // The motor controllers
  frc::PWMSparkMax m_left1;
  frc::PWMSparkMax m_left2;
  frc::PWMSparkMax m_right1;
  frc::PWMSparkMax m_right2;

  // The robot's drive
  frc::DifferentialDrive m_drive{[&](double output) { m_left1.Set(output); },
                                 [&](double output) { m_right1.Set(output); }};
Robot veya Alt sistem constructor’ında aşağıdaki şekildedir:
  m_left1.AddFollower(m_left2);
  m_right1.AddFollower(m_right2);

  // We need to invert one side of the drivetrain so that positive voltages
  // result in both sides moving forward. Depending on how your robot's
  // gearbox is constructed, you might have to invert the left side instead.
  m_right1.SetInverted(true);
def robotInit(self):
    leftLeader = wpilib.Spark(1)
    leftFollower = wpilib.Spark(2)
    leftLeader.addFollower(leftFollower)
    leftLeader.setInverted(
        True
    )  # if you want to invert the entire side you can do so here
    rightLeader = wpilib.Spark(3)
    rightFollower = wpilib.Spark(4)
    rightLeader.addFollower(rightFollower)
    self.drive = wpilib.drive.DifferentialDrive(leftLeader, rightLeader)
Drive Modes
Not
The DifferentialDrive class contains three different default modes of driving your robot’s motors.
Tank Drive, which controls the left and right side independently
Arcade Drive, which controls a forward and turn speed
Curvature Drive, a subset of Arcade Drive, which makes your robot handle like a car with constant-curvature turns.
The DifferentialDrive class contains three default methods for controlling skid-steer or WCD robots. Note that you can create your own methods of controlling the robot’s driving and have them call tankDrive() with the derived inputs for left and right motors.
The Tank Drive mode is used to control each side of the drivetrain independently (usually with an individual joystick axis controlling each). This example shows how to use the Y-axis of two separate joysticks to run the drivetrain in Tank mode. Construction of the objects has been omitted, for above for drivetrain construction and here for Joystick construction.
The Arcade Drive mode is used to control the drivetrain using speed/throttle and rotation rate. This is typically used either with two axes from a single joystick, or split across joysticks (often on a single gamepad) with the throttle coming from one stick and the rotation from another. This example shows how to use a single joystick with the Arcade mode. Construction of the objects has been omitted, for above for drivetrain construction and here for Joystick construction.
Like Arcade Drive, the Curvature Drive mode is used to control the drivetrain using speed/throttle and rotation rate. The difference is that the rotation control input controls the radius of curvature instead of rate of heading change, much like the steering wheel of a car. This mode also supports turning in place, which is enabled when the third boolean parameter is true.
public void teleopPeriodic() {
    // Tank drive with a given left and right rates
    myDrive.tankDrive(-leftStick.getY(), -rightStick.getY());
    // Arcade drive with a given forward and turn rate
    myDrive.arcadeDrive(-driveStick.getY(), -driveStick.getX());
    // Curvature drive with a given forward and turn rate, as well as a button for turning in-place.
    myDrive.curvatureDrive(-driveStick.getY(), -driveStick.getX(), driveStick.getButton(1));
}
void TeleopPeriodic() override {
    // Tank drive with a given left and right rates
    myDrive.TankDrive(-leftStick.GetY(), -rightStick.GetY());
    // Arcade drive with a given forward and turn rate
    myDrive.ArcadeDrive(-driveStick.GetY(), -driveStick.GetX());
    // Curvature drive with a given forward and turn rate, as well as a quick-turn button
    myDrive.CurvatureDrive(-driveStick.GetY(), -driveStick.GetX(), driveStick.GetButton(1));
}
def teleopPeriodic(self):
    # Tank drive with a given left and right rates
    self.myDrive.tankDrive(-self.leftStick.getY(), -self.rightStick.getY())
    # Arcade drive with a given forward and turn rate
    self.myDrive.arcadeDrive(-self.driveStick.getY(), -self.driveStick.getX())
    # Curvature drive with a given forward and turn rate, as well as a button for turning in-place.
    self.myDrive.curvatureDrive(-self.driveStick.getY(), -self.driveStick.getX(), self.driveStick.getButton(1))
Using the MecanumDrive class to control Mecanum Drive robots
MecanumDrive is a method provided for the control of holonomic drivetrains with Mecanum wheels, such as the Kit of Parts chassis with the mecanum drive upgrade kit, as shown above. Instantiating a MecanumDrive is as simple as so:
  private static final int kFrontLeftChannel = 2;
  private static final int kRearLeftChannel = 3;
  private static final int kFrontRightChannel = 1;
  private static final int kRearRightChannel = 0;

  @Override
  public void robotInit() {
    PWMSparkMax frontLeft = new PWMSparkMax(kFrontLeftChannel);
    PWMSparkMax rearLeft = new PWMSparkMax(kRearLeftChannel);
    PWMSparkMax frontRight = new PWMSparkMax(kFrontRightChannel);
    PWMSparkMax rearRight = new PWMSparkMax(kRearRightChannel);
    // Invert the right side motors.
    // You may need to change or remove this to match your robot.
    frontRight.setInverted(true);
    rearRight.setInverted(true);

    m_robotDrive = new MecanumDrive(frontLeft::set, rearLeft::set, frontRight::set, rearRight::set);
  }
 private:
  static constexpr int kFrontLeftChannel = 0;
  static constexpr int kRearLeftChannel = 1;
  static constexpr int kFrontRightChannel = 2;
  static constexpr int kRearRightChannel = 3;

  frc::PWMSparkMax m_frontLeft{kFrontLeftChannel};
  frc::PWMSparkMax m_rearLeft{kRearLeftChannel};
  frc::PWMSparkMax m_frontRight{kFrontRightChannel};
  frc::PWMSparkMax m_rearRight{kRearRightChannel};
  frc::MecanumDrive m_robotDrive{
      [&](double output) { m_frontLeft.Set(output); },
      [&](double output) { m_rearLeft.Set(output); },
      [&](double output) { m_frontRight.Set(output); },
      [&](double output) { m_rearRight.Set(output); }};

  void RobotInit() override {
    // Invert the right side motors. You may need to change or remove this to
    // match your robot.
    m_frontRight.SetInverted(true);
    m_rearRight.SetInverted(true);
  }
    # Channels on the roboRIO that the motor controllers are plugged in to
    kFrontLeftChannel = 2
    kRearLeftChannel = 3
    kFrontRightChannel = 1
    kRearRightChannel = 0

    def robotInit(self):
        self.frontLeft = wpilib.PWMSparkMax(self.kFrontLeftChannel)
        self.rearLeft = wpilib.PWMSparkMax(self.kRearLeftChannel)
        self.frontRight = wpilib.PWMSparkMax(self.kFrontRightChannel)
        self.rearRight = wpilib.PWMSparkMax(self.kRearRightChannel)

        # invert the right side motors
        # you may need to change or remove this to match your robot
        self.frontRight.setInverted(True)
        self.rearRight.setInverted(True)

        self.robotDrive = wpilib.drive.MecanumDrive(
            self.frontLeft, self.rearLeft, self.frontRight, self.rearRight
        )

        self.stick = wpilib.Joystick(self.kJoystickChannel)
Mecanum Drive Modes
Not
The drive axis conventions are different from common joystick axis conventions. See the Axis Conventions above for more information.
The MecanumDrive class contains two different default modes of driving your robot’s motors.
driveCartesian: Angles are measured clockwise from the positive X axis. The robot’s speed is independent from its angle or rotation rate.
drivePolar: Angles are measured counter-clockwise from straight ahead. The speed at which the robot drives (translation) is independent from its angle or rotation rate.
public void teleopPeriodic() {
    // Drive using the X, Y, and Z axes of the joystick.
    m_robotDrive.driveCartesian(-m_stick.getY(), -m_stick.getX(), -m_stick.getZ());
    // Drive at 45 degrees relative to the robot, at the speed given by the Y axis of the joystick, with no rotation.
    m_robotDrive.drivePolar(-m_stick.getY(), Rotation2d.fromDegrees(45), 0);
}
void TeleopPeriodic() override {
    // Drive using the X, Y, and Z axes of the joystick.
    m_robotDrive.driveCartesian(-m_stick.GetY(), -m_stick.GetX(), -m_stick.GetZ());
    // Drive at 45 degrees relative to the robot, at the speed given by the Y axis of the joystick, with no rotation.
    m_robotDrive.drivePolar(-m_stick.GetY(), 45_deg, 0);
}
def teleopPeriodic(self):
    # Drive using the X, Y, and Z axes of the joystick.
    self.robotDrive.driveCartesian(-self.stick.getY(), -self.stick.getX(), -self.stick.getZ())
    # Drive at 45 degrees relative to the robot, at the speed given by the Y axis of the joystick, with no rotation.
    self.robotDrive.drivePolar(-self.stick.getY(), Rotation2d.fromDegrees(45), 0)
Field-Oriented Driving
Jiroskop değerinden döndürülen açı değeri şeklinde driveCartesian(double ySpeed, double xSpeed, double zRotation, double gyroAngle) metoduna 4. bir parametre eklenebilmektedir. Bu parametre sağlanan dönüş değerini ayarlayacaktır. Yönlendirme sebebinden ötürü robotun önü, arkası ya da yanları olmadığı için bu ayar özellikle mecanum sürüşü için faydalıdır. Robot herhangi bir yönde hareket edebilmektedir. Bir jiroskop nesnesinden derece olarak açının eklenmesi durumunda, robotun baktığı yön fark etmeksizin, kumanda kolu ileri oynatıldığında robotun sürücüden uzaklaşmasına, kol sürücülere doğru çekildiğindeyse robotun sürücülere doğru hareket etmesine sebep olacaktır.
The use of field-oriented driving makes often makes the robot much easier to drive, especially compared to a “robot-oriented” drive system where the controls are reversed when the robot is facing the drivers.
Just remember to get the gyro angle each time driveCartesian() is called.
Not
Birçok takım zaman, pürüzsüz bir ivme ile sarsılmayı azaltmak için kumanda kolu gridilerini arttırmaktadır. Bu işlem bir Slew Rate Limiter ile gerçekleştirilebilmektedir.