测试和调整 PID 循环
One challenge in using sensors to control mechanisms is to have a good algorithm to drive the motors to the proper position or speed. The most commonly used control algorithm is called PID control. There is a good set of videos (look for the robot controls playlist) that explain the control algorithms described here. The PID algorithm converts sensor values into motor speeds by:
读取传感器值以确定机器人或机械装置距所需设定值的距离。设定值是与预期目标相对应的传感器值。例如,带有腕关节的机械臂应该能够非常快速地移动到指定角度并停止在传感器指示的那个角度。电位计是可以测量的旋转角度的传感器,通过将其连接到模拟输入,程序可以获得与角度成正比的电压值。
计算误差(传感器值与所需值之差)。错误值的符号指示腕关节位于设定点的哪一侧。例如,负值可能表示所测量的腕部角度大于所需的腕部角度。误差的大小是所测得的手腕角度与实际手腕角度之间的距离。如果误差为零,则测量角度与所需角度完全匹配。该误差可用作PID算法的输入,以计算电动机速度。
The resultant motor speed is then used to drive the motor in the correct direction and a speed that hopefully will reach the setpoint as quickly as possible without overshooting (moving past the setpoint).
WPILib 具有一个 PIDController 类,该类实现PID算法并接受与 Kp,Ki 和 Kd 值相对应的常量。 PID 算法具有三个部分,这些部分有助于根据误差计算电动机速度。
P(Proportional)- 这是一个术语,当某个值乘以常数(Kp)时将产生的电动机速度,从而有助于沿正确的方向和速度移动马达。
I(Integral)- 此术语所指的是连续错误的总和。错误存在的时间越长,积分贡献将越大。这只是一段时间内所有错误的总和。如果手腕由于要移动的负载而不能完全达到设定点,则积分项将继续增加(误差之和),直到它对电动机速度做出足够的贡献以使其移动至设定点。我们使用误差的总和乘以常数(Ki),以缩放系统的积分项。
D(Differential)- 此值是误差的变化率。如果电动机速度太快,则可以用其减慢电动机速度。我们通过计算当前误差值和先前误差值之间的差来得到此值。我们用其乘以常数(kd)来缩放它以匹配系统的其余部分。
调整PID控制器
Tuning the PID controller consists of adjusting constants for accurate results. Shuffleboard helps this process by displaying the details of a PID subsystem with a user interface for setting constant values and testing how well it operates. This is displayed while the robot is operating in test mode (done by setting “Test” in the driver station).

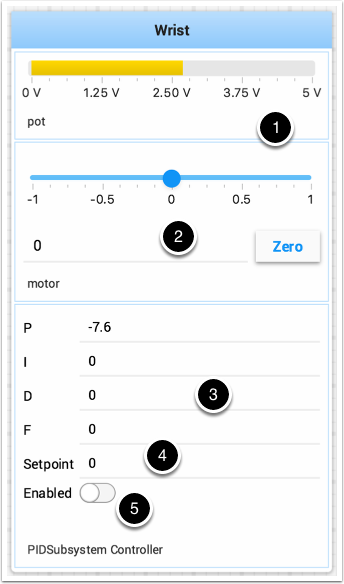
这是腕部子系统的测试模式图片,腕部子系统具有一个电位计作为传感器,以及一个与电机连接的电机控制器。它具有许多与PID子系统对应的子系统。
电位计的模拟输入电压值。这是传感器输入值。
一个滑动器以0为停止方向沿任一方向移动手腕马达。正值和负值将对应于向上或向下移动。
如上所述的PID常数(F是用于速度PID回路的前馈值)
当手腕达到所需值时,对应于电位计值的设定值
启用PID控制器-如果不起作用,请参见下文。
尝试各种PID增益以获得所需的电动机性能。您可以查看本文开头链接的视频或互联网上的其他资料来源,以获得所需的效果。
重要
The enable option does not affect the PIDController introduced in 2020, as the controller is updated every robot loop. See the example below on how to retain this functionality.
在新的 PIDController 中启用功能
以下示例演示了如何在仪表板上创建一个按钮,该按钮将启用/禁用PIDController。
ShuffleboardTab tab = Shuffleboard.getTab("Shooter");
GenericEntry shooterEnable = tab.add("Shooter Enable", false).getEntry();

// Command Example assumed to be in a PIDSubsystem
new NetworkButton(shooterEnable).onTrue(new InstantCommand(m_shooter::enable));

// Timed Robot Example
if (shooterEnable.getBoolean()) {
  // Calculates the output of the PID algorithm based on the sensor reading
  // and sends it to a motor
  motor.set(pid.calculate(encoder.getDistance(), setpoint));
}
frc::ShuffleboardTab& tab = frc::Shuffleboard::GetTab("Shooter");
nt::GenericEntry& shooterEnable = *tab.Add("Shooter Enable", false).GetEntry();

// Command-based assumed to be in a PIDSubsystem
frc2::NetworkButton(shooterEnable).OnTrue(frc2::InstantCommand([&] { m_shooter.Enable(); }));

// Timed Robot Example
if (shooterEnable.GetBoolean()) {
  // Calculates the output of the PID algorithm based on the sensor reading
  // and sends it to a motor
  motor.Set(pid.Calculate(encoder.GetDistance(), setpoint));
}
from wpilib.shuffleboard import Shuffleboard

tab = Shuffleboard.getTab("Shooter")
shooterEnable = tab.add("Shooter Enable", false).getEntry()

# Command Example assumed to be in a PIDSubsystem
NetworkButton(shooterEnable).onTrue(InstantCommand(m_shooter.enable()))

# Timed Robot Example
if (shooterEnable.getBoolean()):
  # Calculates the output of the PID algorithm based on the sensor reading
  # and sends it to a motor
  motor.set(pid.calculate(encoder.getDistance(), setpoint))