创建机器人程序
安装完所有内容后,我们就可以创建机器人程序了。WPILib随附了多个机器人程序模板。强烈建议新用户使用这些模板。但是,高级用户可以自由地从头开始编写自己的机器人代码。
选择基类
要使用WPILib机器人程序模板之一启动项目,用户必须首先为其机器人选择基类。用户将这些基类子类化以创建其主Robot类,该主类控制机器人程序的主要流程。基类有三种选择:
TimedRobot
The TimedRobot class is the base class recommended for most users. It provides control of the robot program through a collection of init(), periodic(), and exit() methods, which are called by WPILib during specific robot states (e.g. autonomous or teleoperated). During these calls, your code typically polls each input device and acts according to the data it receives. For instance, you would typically determine the position of the joystick and state of the joystick buttons on each call and act accordingly. The TimedRobot class also provides an example of retrieving autonomous routines through SendableChooser (Java/ C++
备注
提供了“ TimedRobot Skeleton”模板,该模板删除了一些有用的注释和自动阶段示例。如果您已经熟悉`TimedRobot`,则可以使用它。下面显示的示例是“ TimedRobot Skeleton”。
 7import edu.wpi.first.wpilibj.TimedRobot;
 8
 9/**
10 * The VM is configured to automatically run this class, and to call the functions corresponding to
11 * each mode, as described in the TimedRobot documentation. If you change the name of this class or
12 * the package after creating this project, you must also update the build.gradle file in the
13 * project.
14 */
15public class Robot extends TimedRobot {
16  /**
17   * This function is run when the robot is first started up and should be used for any
18   * initialization code.
19   */
20  @Override
21  public void robotInit() {}
22
23  @Override
24  public void robotPeriodic() {}
25
26  @Override
27  public void autonomousInit() {}
28
29  @Override
30  public void autonomousPeriodic() {}
31
32  @Override
33  public void teleopInit() {}
34
35  @Override
36  public void teleopPeriodic() {}
37
38  @Override
39  public void disabledInit() {}
40
41  @Override
42  public void disabledPeriodic() {}
43
44  @Override
45  public void testInit() {}
46
47  @Override
48  public void testPeriodic() {}
49
50  @Override
51  public void simulationInit() {}
52
53  @Override
54  public void simulationPeriodic() {}
55}
 5#include "Robot.h"
 6
 7void Robot::RobotInit() {}
 8void Robot::RobotPeriodic() {}
 9
10void Robot::AutonomousInit() {}
11void Robot::AutonomousPeriodic() {}
12
13void Robot::TeleopInit() {}
14void Robot::TeleopPeriodic() {}
15
16void Robot::DisabledInit() {}
17void Robot::DisabledPeriodic() {}
18
19void Robot::TestInit() {}
20void Robot::TestPeriodic() {}
21
22void Robot::SimulationInit() {}
23void Robot::SimulationPeriodic() {}
24
25#ifndef RUNNING_FRC_TESTS
26int main() {
27  return frc::StartRobot<Robot>();
28}
29#endif
默认情况下,周期方法每20毫秒调用一次。这可以通过使用新的所需更新率调用超类构造函数来更改。
危险
Changing your robot rate can cause some unintended behavior (loop overruns). Teams can also use Notifiers to schedule methods at a custom rate.
public Robot() {
  super(0.03); // Periodic methods will now be called every 30 ms.
}
Robot() : frc::TimedRobot(30_ms) {}
RobotBase
RobotBase类是提供最基本的基类,一般不建议直接使用。没有为用户处理机器人控制流程。一切都必须从头开始写在startCompetition()方法内部。默认情况下,模板展示了如何处理不同的操作模式(遥控,自动等)。
备注
RobotBase Skeleton模板提供了一个空白的方法startCompetition()。
Command Robot
The Command Robot framework adds to the basic functionality of a Timed Robot by automatically polling inputs and converting the raw input data into events. These events are tied to user code, which is executed when the event is triggered. For instance, when a button is pressed, code tied to the pressing of that button is automatically called and it is not necessary to poll or keep track of the state of that button directly. The Command Robot framework makes it easier to write compact easy-to-read code with complex behavior, but requires an additional up-front time investment from a programmer in order to understand how the Command Robot framework works.
使用“Command Robot”的队伍需要查看:ref:Command-Based Programming Tutorial <docs/software/commandbased/index:Command-Based Programming>.
Romi
使用 Romi 的团队应使用“ Romi-Timed”或“ Romi-Command Bot”模板。
Romi - Timed
Romi - Timed模板提供了一个RomiDrivetrain类,该类公开了一个arcadeDrive(double xaxisSpeed, double zaxisRotate)方法。用户可以为此arcadeDrive函数提供参数。
该类还提供用于检索和重置Romi板载编码器的功能。
Romi - Command Bot
Romi - Command Bot模板提供了一个RomiDrivetrain子系统,该子系统公开了一个arcadeDrive(double xaxisSpeed, double zaxisRotate)方法。用户可以给此arcadeDrive函数提供参数。
该子系统还提供用于检索和重置Romi板载编码器的功能。
不使用基类
如果需要,用户可以完全省略基类,而只需使用一种main()方法编写其程序即可,就像处理其他任何程序一样。这非常不推荐-写机器人的代码时,用户不应该“另起炉灶” -但还是支持那些希望有他们的程序的绝对控制权的人。
警告
用户不应该修改机器人程序的main()方法,除非他们绝对确定自己在做什么。
创建新的 WPILib 项目
Once we’ve decided on a base class, we can create our new robot project. Bring up the Visual Studio Code command palette with Ctrl+Shift+P. Then, type “WPILib” into the prompt. Since all WPILib commands start with “WPILib”, this will bring up the list of WPILib-specific VS Code commands. Now, select the Create a new project command:

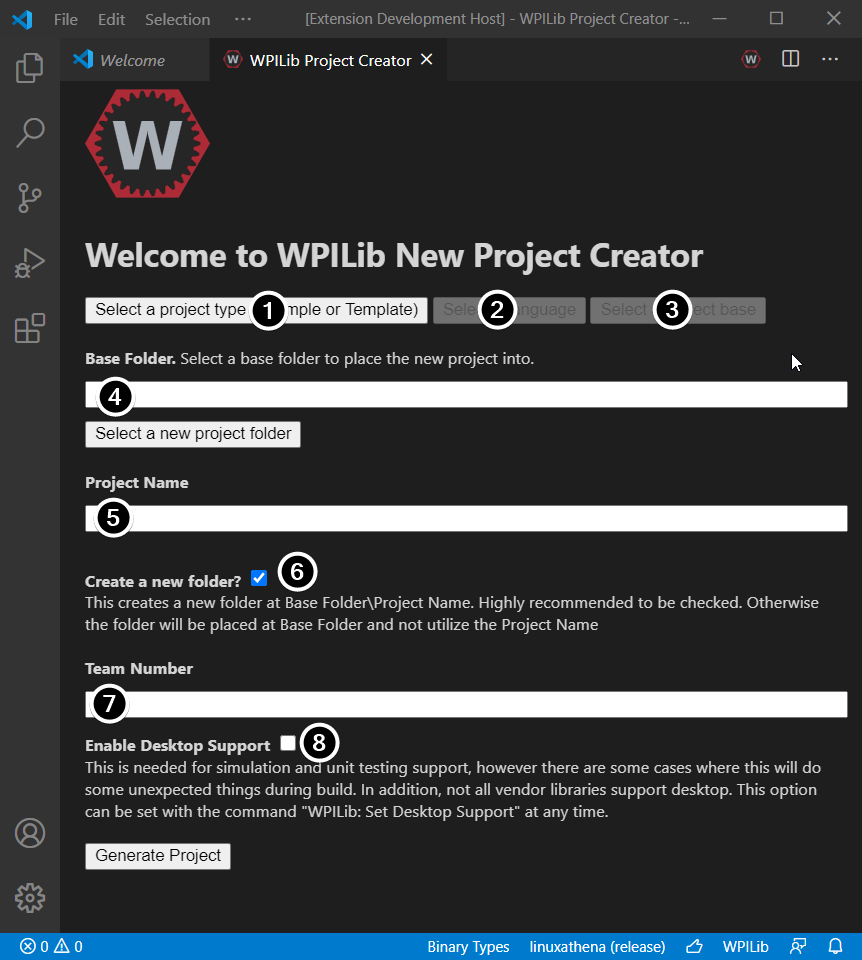
这将打开“新项目创建者窗口”:

创建新建项目窗口的元素说明如下:
项目类型:我们希望创建的项目类型。这可以是示例项目,也可以是WPILib提供的项目模板之一。每个机器人基本类都有模板。此外,还有:ref:`Command-based <docs/software/commandbased/what-is-command-based:What is “command-based” programming?>`项目的模板,这些模板基于TimedRobot基类构建,但包含许多其他功能-强烈建议新团队使用这种类型的机器人程序。
语言:这是将用于该项目的语言(C ++或Java)。
基础文件夹:如果这是模板项目,则指定将使用的模板类型。
项目位置:确定机器人项目所在的文件夹。
项目名称:机器人项目的名称。如果选中了“创建新文件夹”框,这还将指定项目文件夹的名称。
创建新文件夹:如果选中此选项,将创建一个新文件夹,以将项目保存在先前指定的文件夹中。如果未选中,则项目将直接位于先前指定的文件夹中。如果文件夹不为空且未选中,将引发错误。
团队编号:项目的团队编号,将用于项目中的程序包名称并在部署代码时定位机器人。
启用桌面支持:启用单元测试和模拟。尽管WPILib支持此功能,但第三方软件库可能不支持。如果库不支持桌面,则您的代码可能无法编译或崩溃。除非需要进行单元测试或仿真并且所有库都支持它,否则应将其保持选中状态。
完成以上所有配置后,单击“生成项目”,将创建机器人项目。
备注
项目生成中的任何错误将显示在屏幕的右下角。
警告
Creating projects on OneDrive is not supported as OneDrive’s caching interferes with the build system. Some Windows installations put the Documents and Desktop folders on OneDrive by default.
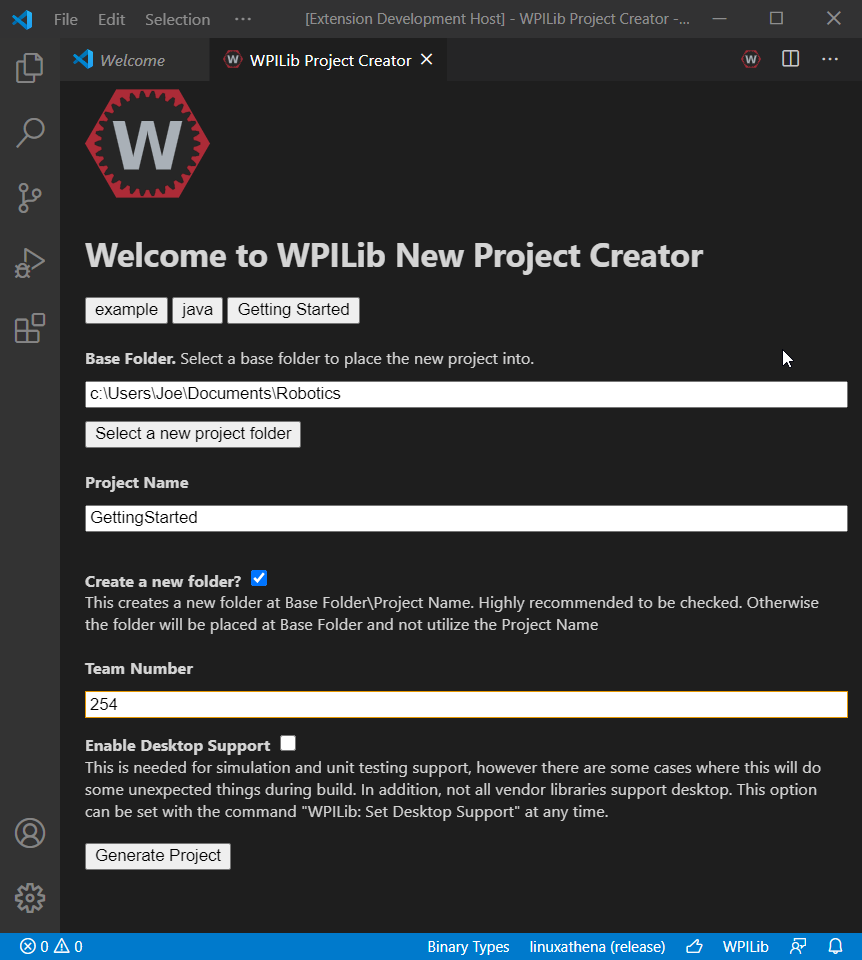
选择所有选项后的示例如下所示。

打开新项目
After successfully creating your project, VS Code will give the option of opening the project as shown below. We can choose to do that now or later by typing Ctrl+K then Ctrl+O (or just Command+O on macOS) and select the folder where we saved our project.

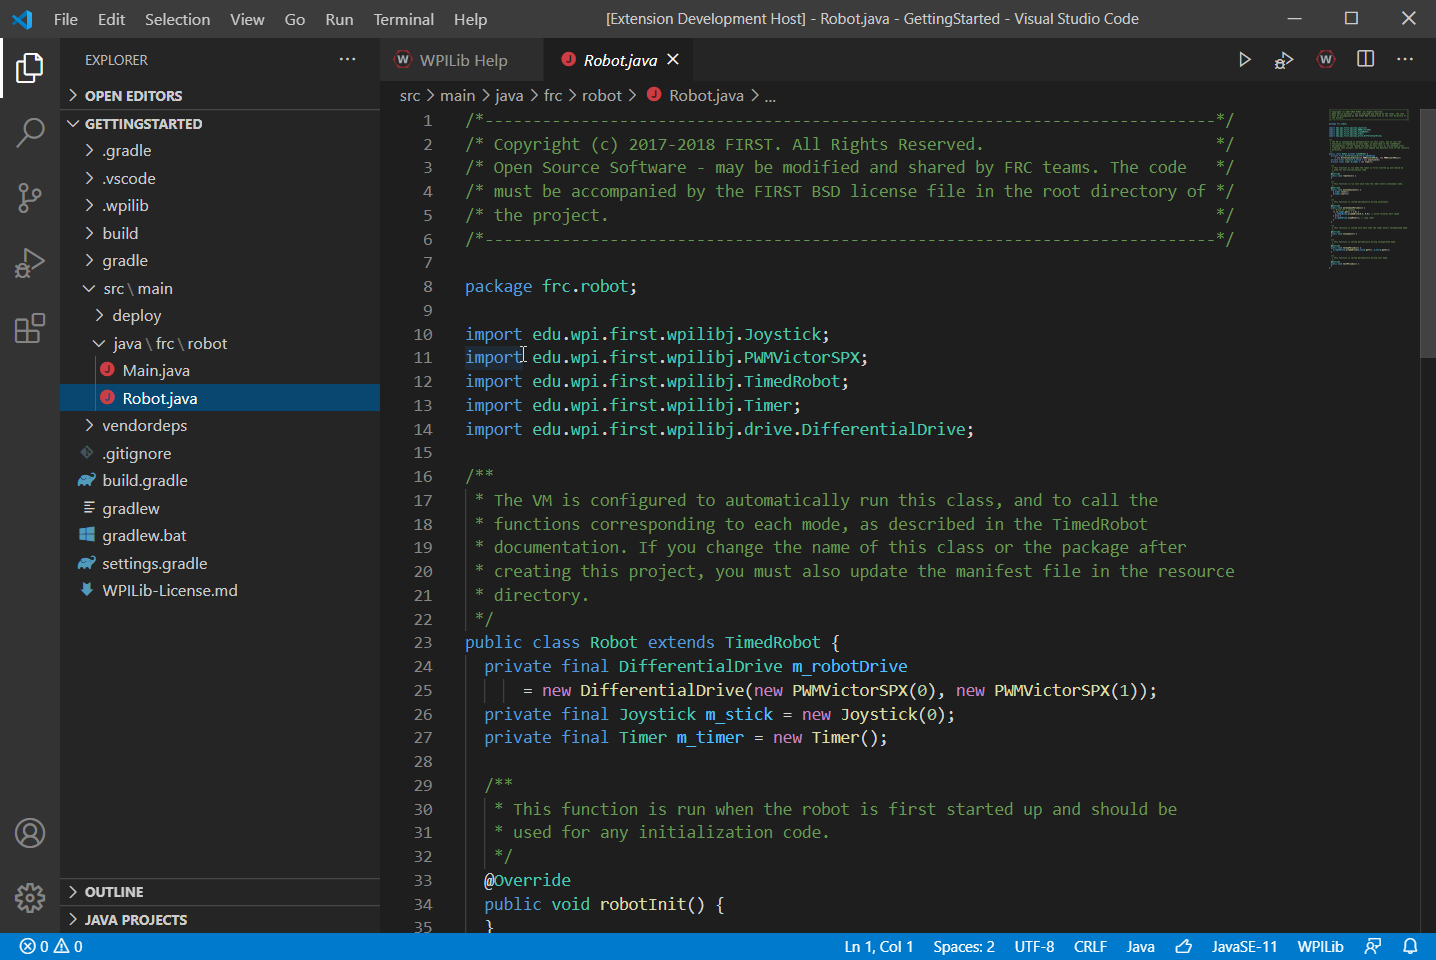
打开后,我们将在左侧看到项目层次结构。双击文件将在编辑器中打开该文件。

C ++配置(仅C ++)
对于C ++项目,还有另外一步来设置IntelliSense。每当我们打开一个项目时,我们都应该在右下角出现一个弹出窗口,要求刷新C ++配置。单击“是”以设置IntelliSense。
