WPILib Installation Guide
Note
This setup is for C++/Java teams. LabVIEW teams should proceed to Installing LabVIEW for FRC.
Offline Installer
Download the appropriate installer for your Windows installation (32 bit or 64 bit) from GitHub. If you’re not sure, open Control Panel -> System to check. After the zip file is downloaded, ensure that the installer is extracted before attempting to run it. Running it while the installer is inside the zip will cause the installation process to fail.
Double click on the installer to run it. If you see any Security warnings, click Run (Windows 7) or More Info -> Run Anyway (Windows 8+).
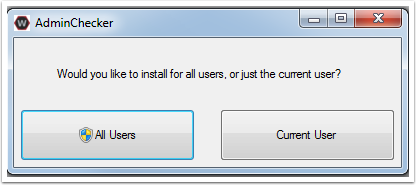
Choose whether to install for All Users on the machine or the Current User. The All Users option requires administrator privileges, but installs in a way that is accessible to all user accounts, the Current User install is only accessible from the account it is installed from.
If you select All Users, you will need to accept the security prompt that appears to allow administrator access.
Note
Regardless of whether All Users or Current User is chosen, the software is installed to
C:\Users\Public\wpilib\YYYYwhere YYYY is the current FRC year. If you choose All Users, then shortcuts are installed to all users desktop and start menu and system environment variables are set. If Current User is chosen, then shortcuts and environment variables are set for only the current user.
Download Visual Studio Code
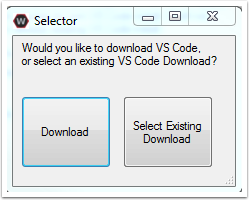
For licensing reasons, the installer cannot contain the VS Code installer bundled in. Click Select/Download VS Code to either download the VS Code installer or select a pre-downloaded copy. If you intend to install on other machines without internet connections, after the download completes, you can click Open Downloaded File to be taken to the zip file on the file system to copy along with the Offline Installer.
Execute Install
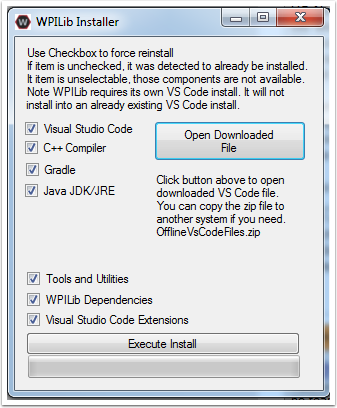
Make sure all checkboxes are checked (unless you have already installed 2020 WPILib software on this machine and the software unchecked them automatically), then click Execute Install.
Finished
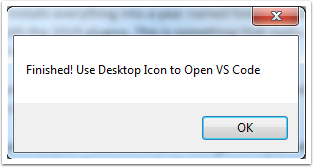
When the installer completes, you will now be able to open and use the WPILib version of VS Code. If you are using any 3rd party libraries, you will still need to install those separately before using them in robot code.
What’s installed?
The Offline Installer installs the following components:
Visual Studio Code - The supported IDE for 2019 and later robot code development. The offline installer sets up a separate copy of VS Code for WPILib development, even if you already have VS Code on your machine. This is done because some of the settings that make the WPILib setup work may break existing workflows if you use VS Code for other projects.
C++ Compiler - The toolchains for building C++ code for the roboRIO
Gradle - The specific version of Gradle used for building/deploying C++ or Java robot code
Java JDK/JRE - A specific version of the Java JDK/JRE that is used to build Java robot code and to run any of the Java based Tools (Dashboards, etc.). This exists side by side with any existing JDK installs and does not overwrite the
JAVA_HOMEvariableWPILib Tools - SmartDashboard, Shuffleboard, Robot Builder, Outline Viewer, Pathweaver
WPILib Dependencies - OpenCV, etc.
VS Code Extensions - WPILib extensions for robot code development in VS Code
What’s Installed - Continued
The Offline Installer also installs a Desktop Shortcut to the WPILib copy of VS Code and sets up a command shortcut so this copy of VS Code can be opened from the command line using the command
frccode2020.
Both of these reference the specific year as the WPIlib C++ tools will now support side-by-side installs of multiple environments from different seasons.
Getting Visual Studio Code
VS Code is the IDE (Integrated Development Environment) that is used for 2019 and beyond. It needs to be installed on any development computer. It can be downloaded here: code.visualstudio.com. For 2020, the recommended version is 1.41.1 which can be directly downloaded here: https://update.code.visualstudio.com/1.41.1/darwin/stable
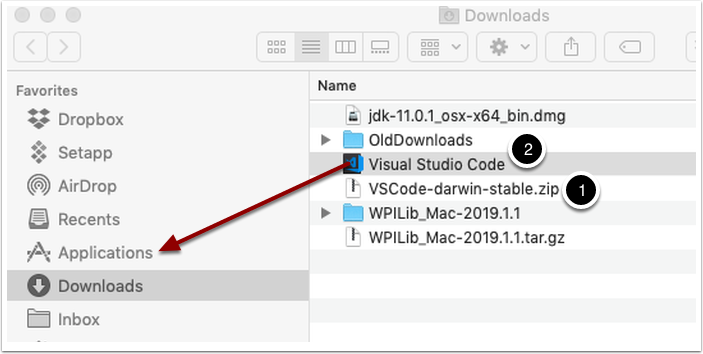
The downloaded file will be “VSCode-darwin-stable.zip” (1)
Once downloaded, double-click on the zip file to expand it and copy the new file: “Visual Studio Code” to the Applications folder (2).
Download the WPILib release and move the directory
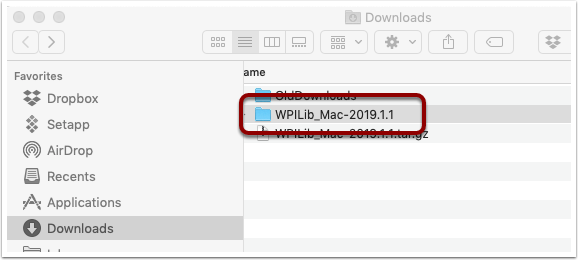
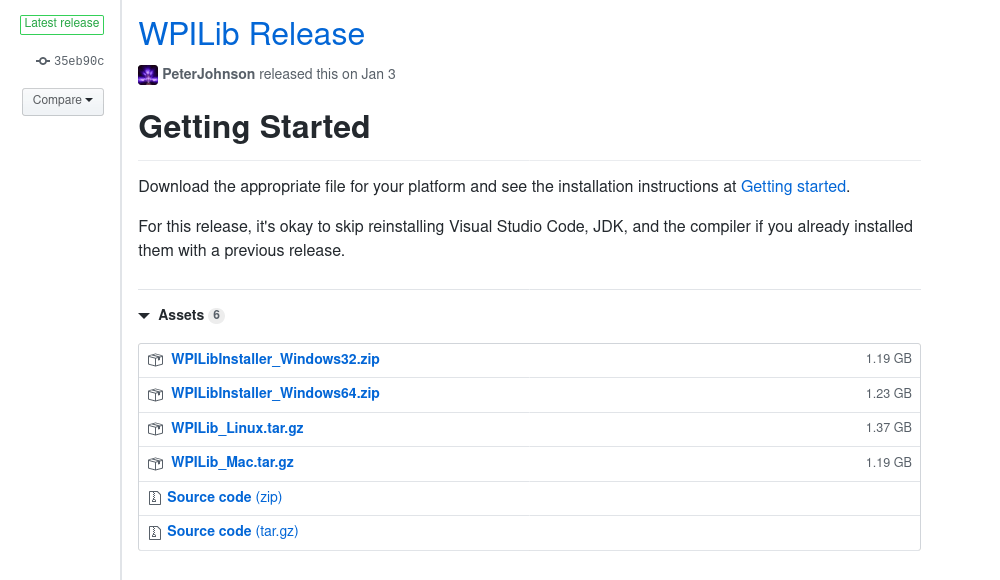
Download the software release by navigating to this page: https://github.com/wpilibsuite/allwpilib/releases and downloading the macOS release.

Unzip and untar the file by looking at the file in the explorer and double-clicking on it, once or twice to unzip (remove the .gz extension) and again to untar it (remove the .tar extension). When finished it should like like the folder shown below.
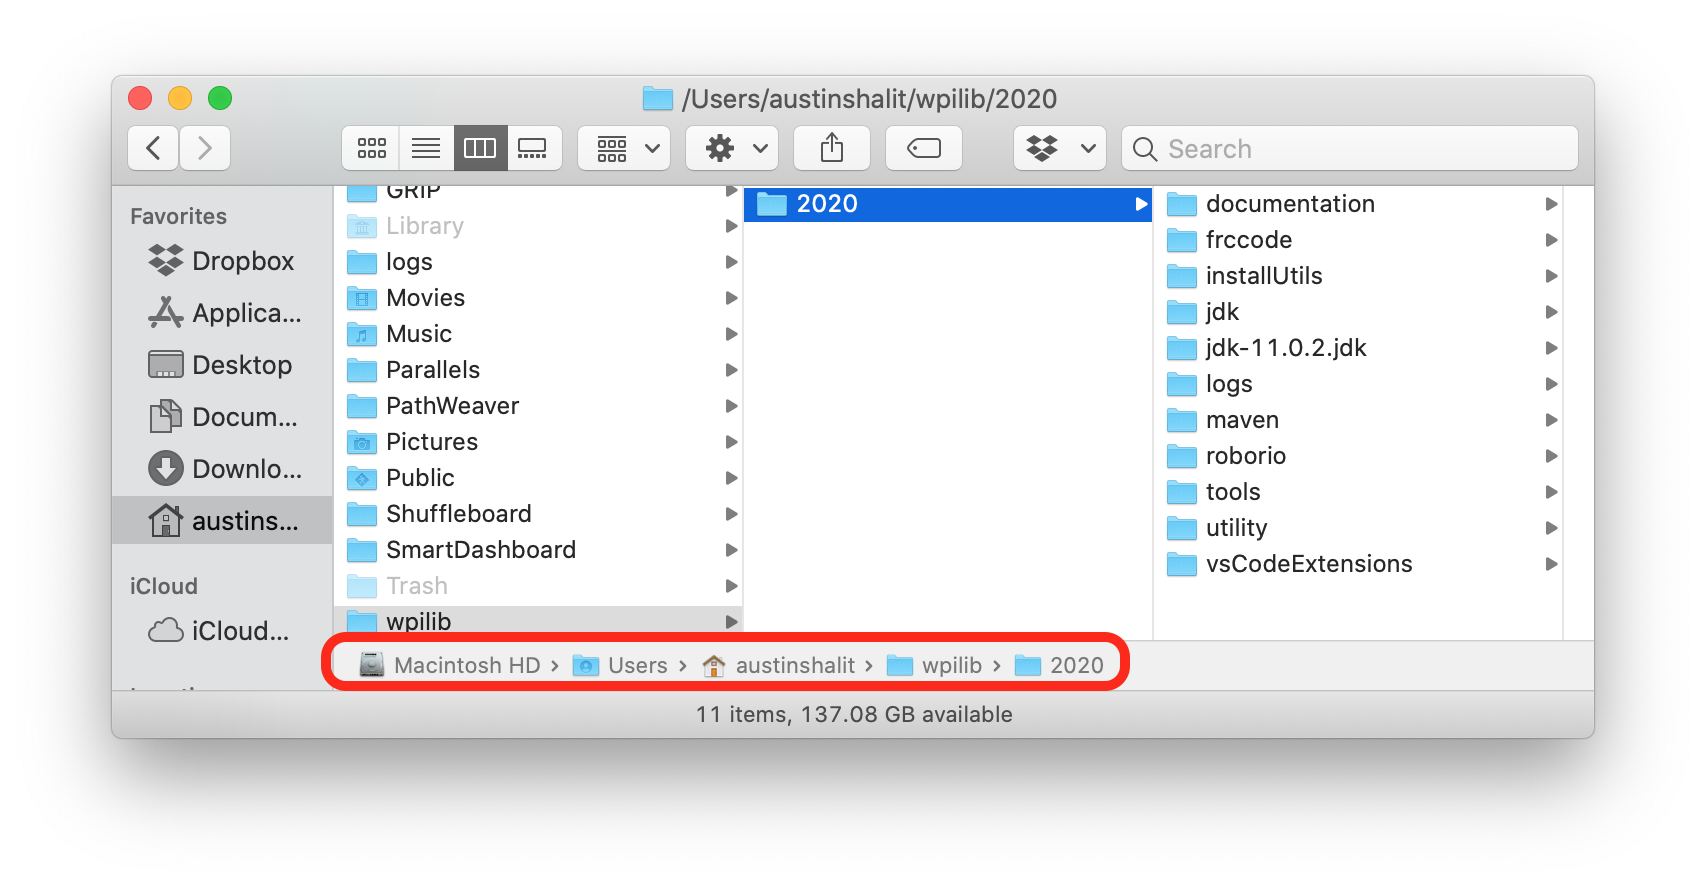
Using Finder (or command line) copy the contents of the folder to a new folder in your home directory, ~/wpilib/2020 as shown below.
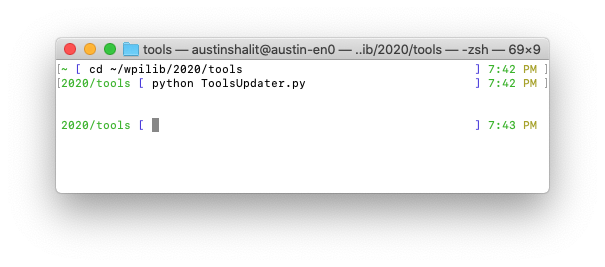
Run the ToolsUpdater.py script
To update all the additional tools WPILib tools, open a terminal window and change directory to ~/wpilib/2020/tools and run the script
ToolsUpdater.pywith the commands:cd ~/wpilib/2020/tools python ToolsUpdater.pyThis should populate the tools directory with all of the WPILib tools (Shuffleboard, Robot Builder, PathWeaver, etc.)
Installing the extensions for WPILib development
Before using VS Code for WPILib development there are a number of extensions that need to be installed. Start up VS Code and type the shortcut Cmd-Shift-P to bring up the list of commands available. Start typing “Install from VSIX into the search box. Choose that command. In the file selection box select Cpp.vsix.
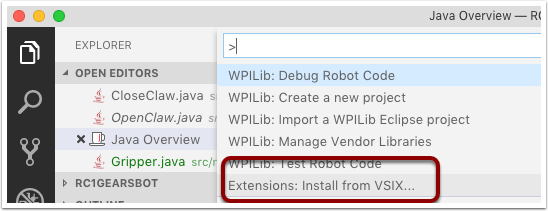
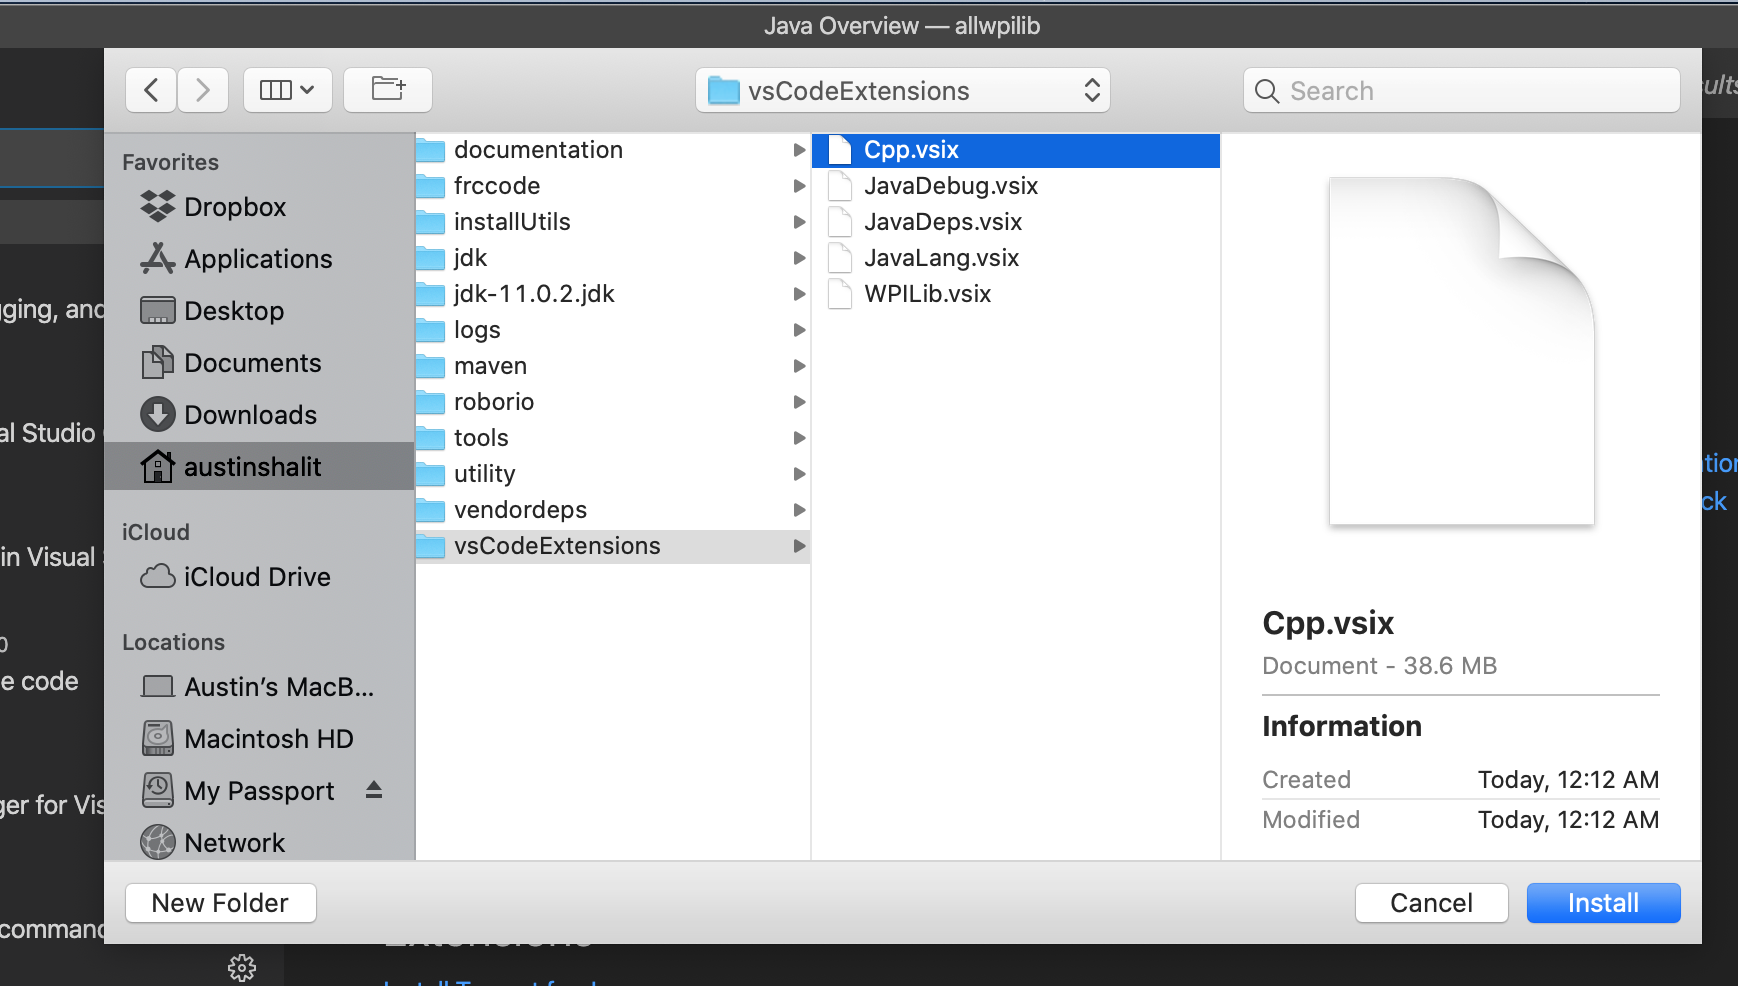
You should see a message confirming the install and asking to reload VS Code. Click the reload button then repeat the vsix installation for the rest of the vsix files in this order:
Cpp.vsix
JavaLang.vsix
JavaDeps.vsix
JavaDebug.vsix
WPILib.vsix
Setting up Visual Studio Code to use Java 11
The WPILib installation includes a JDK, however you need to point VS Code at where it is. To do this:
Open VS Code
Press Ctrl + Shift + P and type WPILib or click on the WPILib icon in the top right to open the WPILib Command Palette
Begin typing Set VS Code Java Home to FRC Home and select that item from the dropdown

Allow toolchain to bypass Gatekeeper
In order to build certain components, you may be prompted with a Gatekeeper dialog that says: “cannot be opened because the developer cannot be verified”.
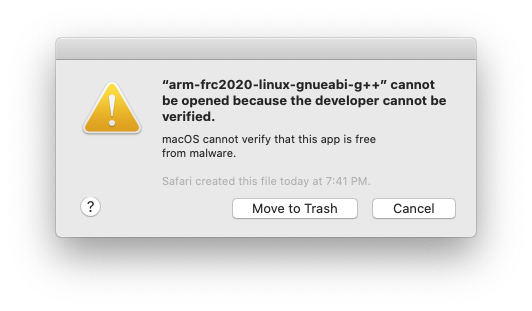
The name of the programs that will cause this are named:
arm-frc2020-linux-gnueabi-g++
cc1
arm-frc2020-linux-gnueabi-gcc
cc1plus
as
collect2
ld
liblto_plugin.so
arm-frc2020-linux-gnueabi-objcopy
arm-frc2020-linux-gnueabi-stripBuilds will fail when this dialog appears. Follow the steps below and try to rerun the build.
Press the Cancel button on the dialog.
Open System Preferences to the “Security and Privacy” pane
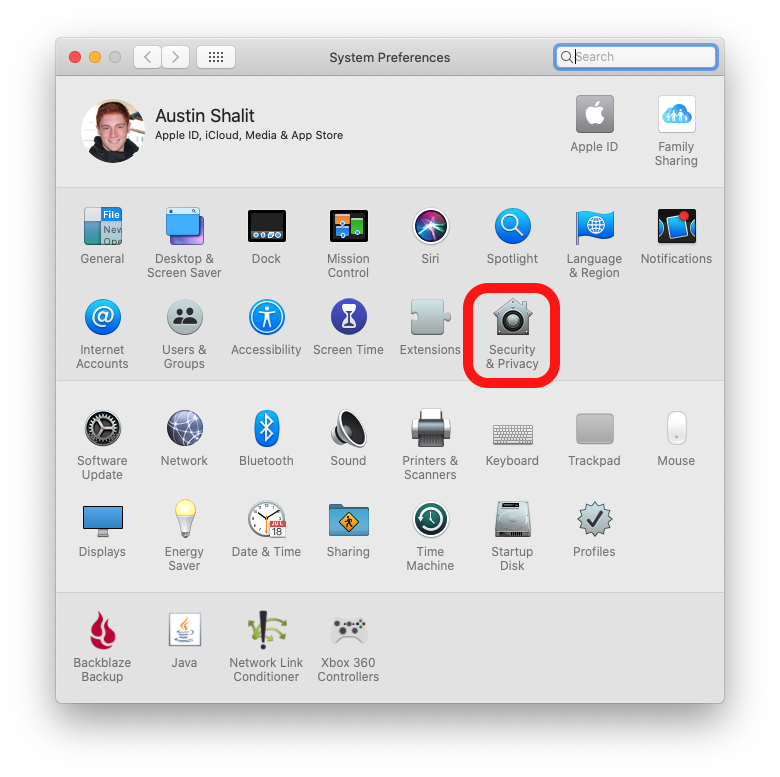
On the “General” tab, press Allow Anyway

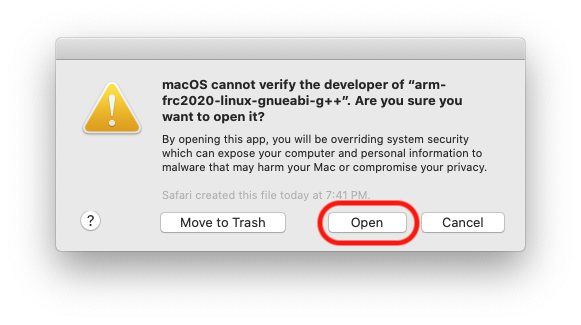
Rerun the build that caused the inital dialog to appear
A similar dialog will appear but will have a Open button. Press the Open button
You may need to repeat this process multiple times for each of the programs listed above but once each program has been whitelisted, it should stay whitelisted and not prompt you again.
Note
These instructions are based on Ubuntu 18.04, but would be similar for other Debian based Linux distributions.
Installing Visual Studio Code
Download the Linux .deb file from code.visualstudio.com. For 2020, the recommended version is 1.41.1 which can be directly downloaded here: https://update.code.visualstudio.com/1.41.1/linux-deb-x64/stable
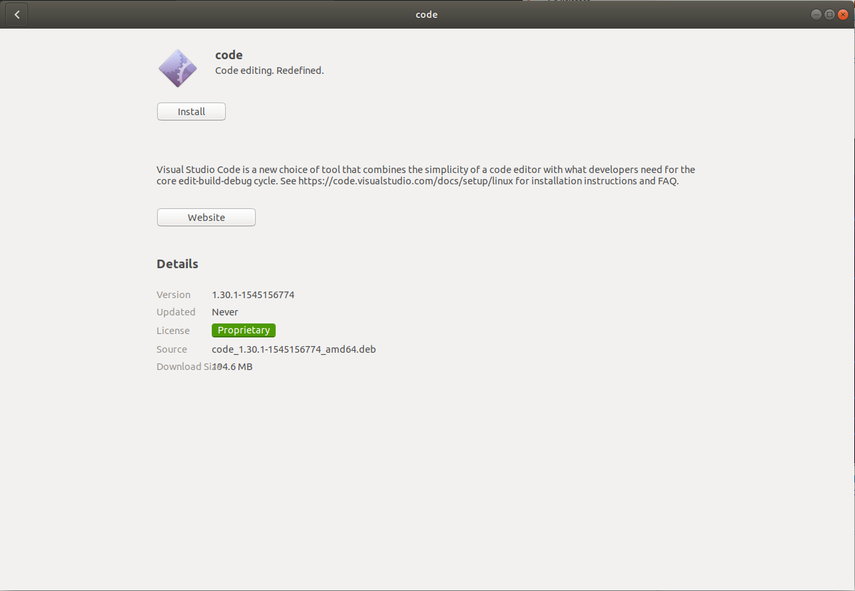
Double-click on the .deb file in the file explorer
Click the “Install” button to install VS Code
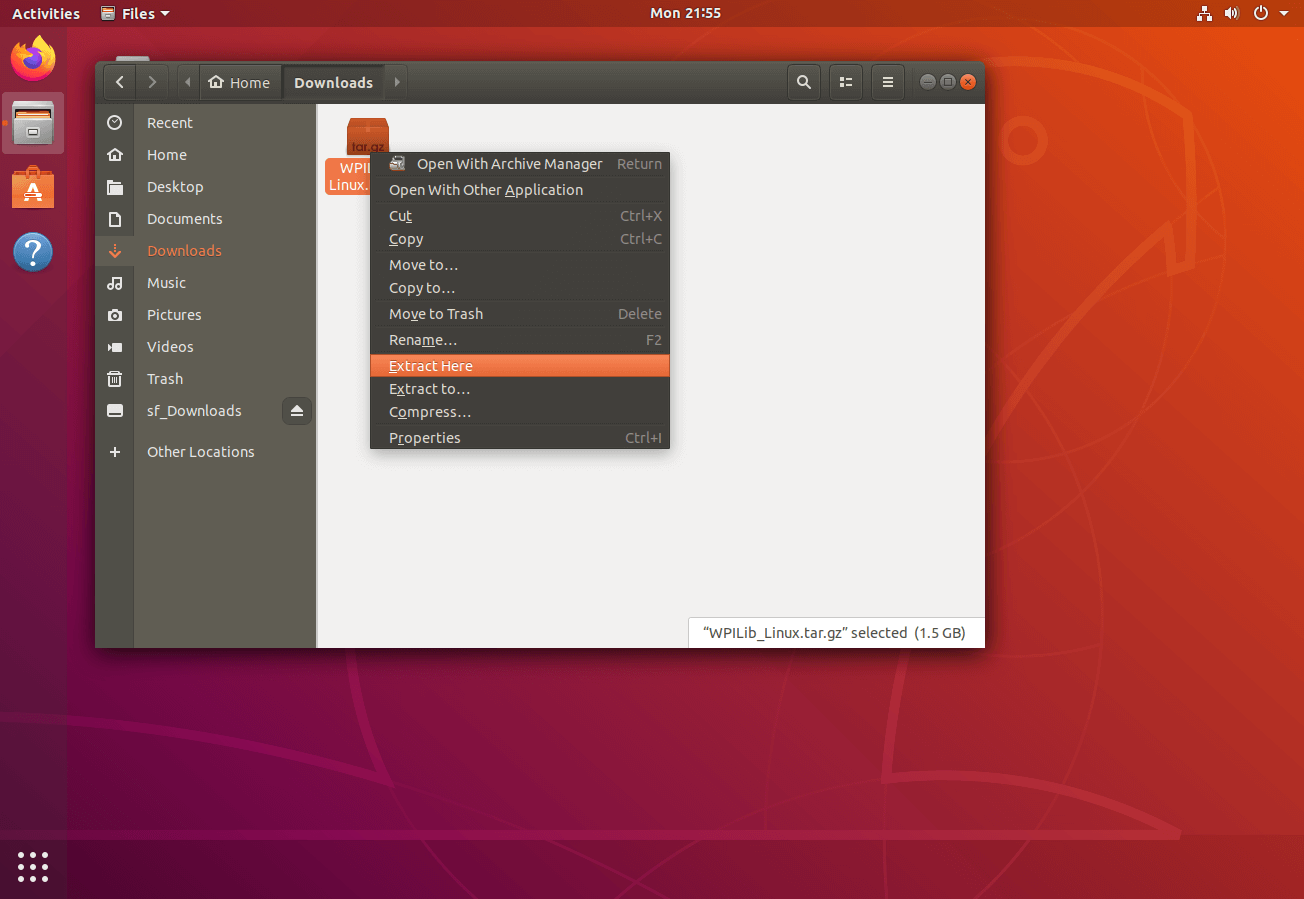
Download the most recent WPILib release
Download the latest Linux release from https://github.com/wpilibsuite/allwpilib/releases Right-click on the downloaded archive, click “Extract Here”
Moving to wpilib/2020
Create a directory structure in your home directory called wpilib/2020 - either from the file manager or with
$ mkdir -p ~/wpilib/2020Drag the contents of WPILib_Linux-VERSIONUM directory to ~/wpilib/2020 or run
$ mv -v WPILib_Linux-VERSIONUM/* ~/wpilib/2020
Running Tools Updater
To update or extract the WPILib tools (Dashboards, Robot Builder, etc.), run:
$ example@pc:~/Downloads$ cd ~/wpilib/2020/tools
$ example@pc:~/wpilib/2020/tools$ python3 ToolsUpdater.py
Installing the extensions for WPILib Visual Studio Code
Start VS Code (
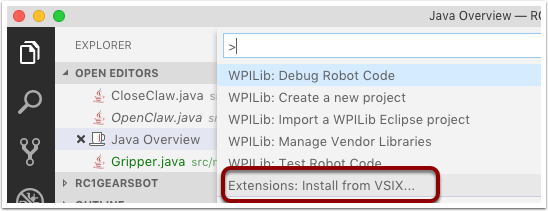
$ codeor search “Visual Studio Code” in your application launcher)Control-Shift-P to bring up the command palette, type “Install from VSIX”
Select “Extensions: Install from VSIX”
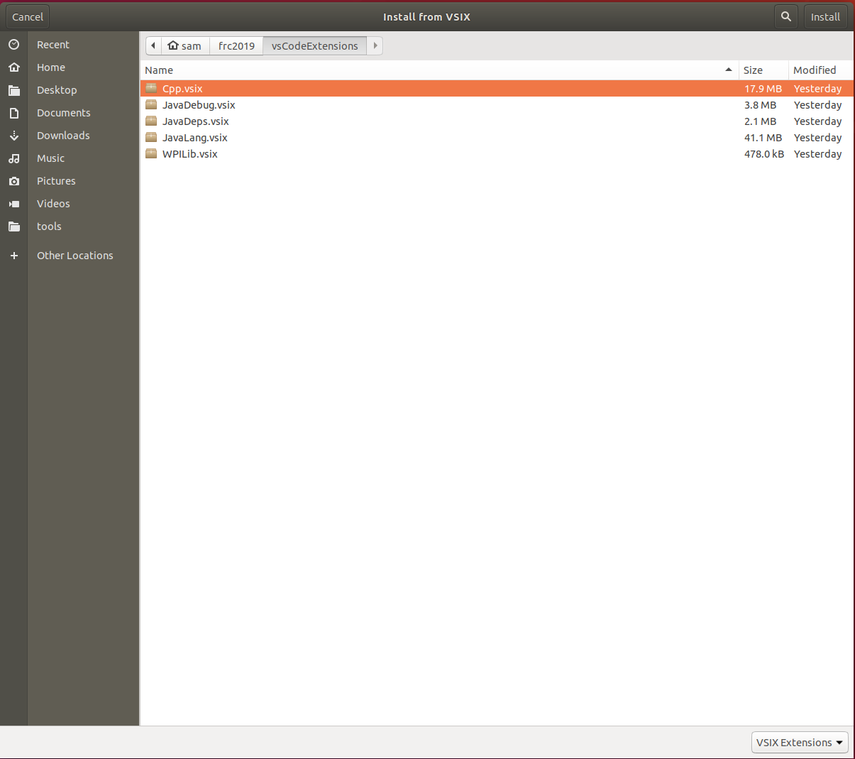
Navigate to
~/wpilib/2020/vsCodeExtensionsand select Cpp.vsixRepeat for JavaLang.vsix, JavaDeps.vsix, JavaDebug.vsix, and WPILib.vsix in that order
Setting up Visual Studio Code to use Java 11
The WPILib installation includes a JDK, however you need to point VS Code at where it is. To do this:
Open VS Code
Press Ctrl-Shift-P and type WPILib or click on the WPILib icon in the top right to open the WPILib Command Palette
Begin typing Set VS Code Java Home to FRC Home and select that item from the dropdown.

Install libvulkan for simulation GUI
To install libvulkan in order to run the simulation GUI run:
$ example@pc:~$ sudo apt-get install libvulkan1
Note
The installation directory has changed for 2020. In 2019 the software was installed to ~\frcYYYY where ~ is C:\Users\Public on Windows and YYYY is the FRC year. In 2020 and later it is installed to ~\wpilib\YYYY. This lessens clutter when multiple years software are installed.
Uninstall Instructions
WPILib is designed to install to different folders for different years, so that it is not necessary to uninstall a previous version before installing this year’s WPILib. However, the following instructions can be used to uninstall WPILib if desired.
Delete the appropriate wpilib folder (2019:
c:\Users\Public\frc2019, 2020 and later:c:\Users\Public\wpilib\YYYYwhereYYYYis the year to uninstall)Delete the desktop icons at
C:\Users\Public\Public DesktopDelete the path environment variables.
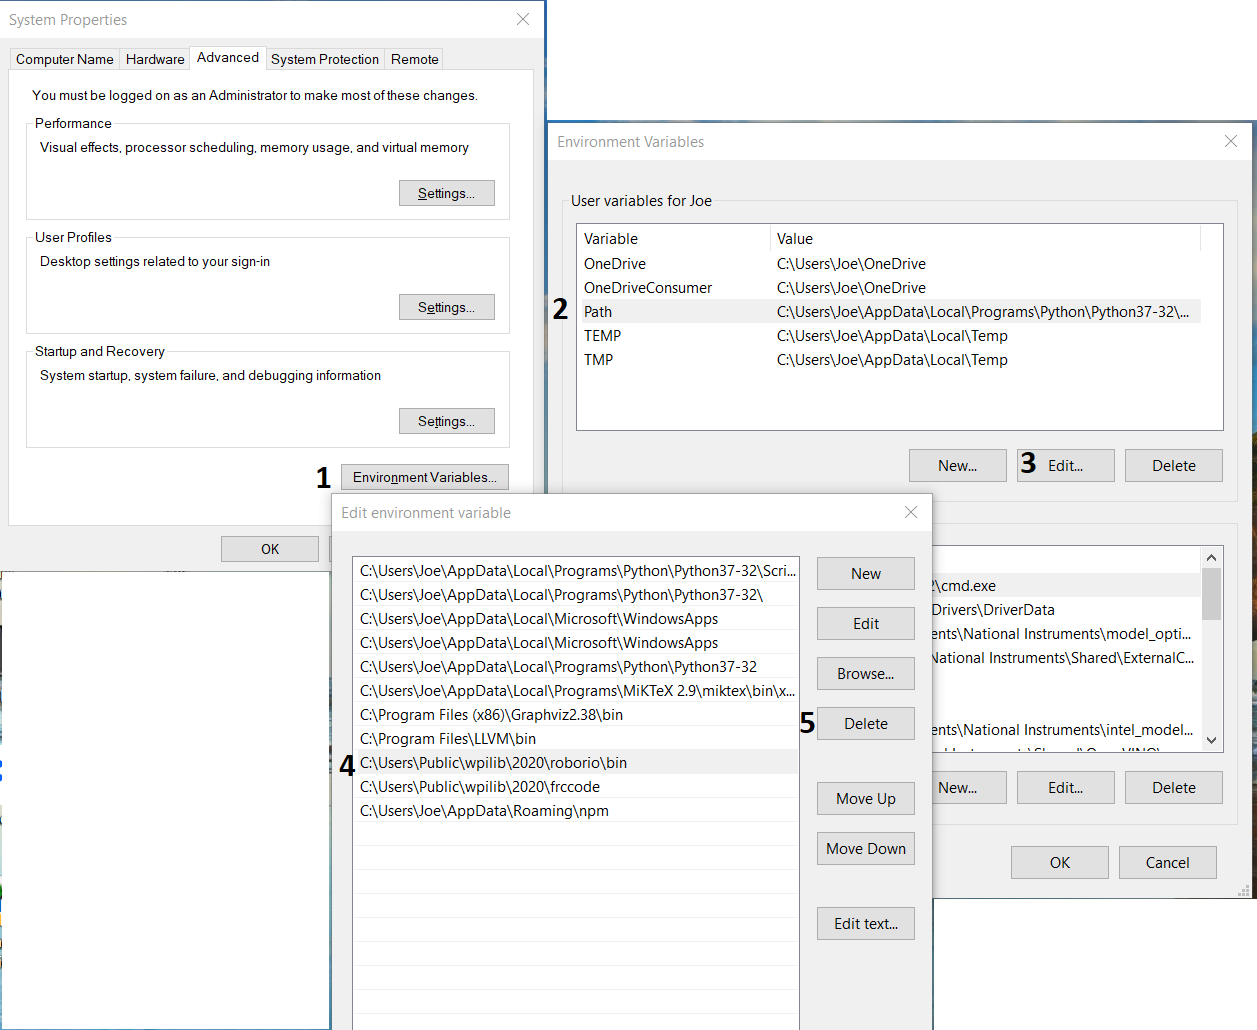
In the start menu, type environment and select “edit the system environment variables”
Click on the environment variables button (1).
In the user variables, select path (2) and then click on edit (3).
Select the path with
roborio\bin(4) and click on delete (5).Select the path with
frccodeand click on delete (5).Repeat steps 3-6 in the Systems Variable pane.
Delete Visual Studio Code from the Applications folder. Alternately, the extensions can be uninstalled
Delete the appropriate wpilib folder (2019:
~/frc2019, 2020 and later:~/wpilib/YYYYwhereYYYYis the year to uninstall)
Delete the appropriate wpilib folder (2019:
~/frc2019, 2020 and later:~/wpilib/YYYYwhereYYYYis the year to uninstall). egrm -rf ~/frc2019Uninstall Visual Studio Code
sudo dpkg -r code. Alternately, the extensions can be uninstalled