WPILib Installation Guide
This guide is intended for Java and C++ teams. LabVIEW teams can skip to Installing LabVIEW for FRC (LabVIEW only). Additionally, the below tutorial shows Windows 10, but the steps are identical for all operating systems. Notes differentiating operating systems will be shown.
Prerequisites
You can download the latest release of the installer from GitHub. Ensure that you download the correct binary for your OS and architecture.
Note
Windows 7 users must have an updated system with this update installed.
Important
The minimum supported macOS version is Mojave (10.14.x).
Extracting the Installer
When you download the WPILib installer, it is distributed as a disk image file .iso for Windows, .tar.gz for Linux, and distributed as a DMG for MacOS.
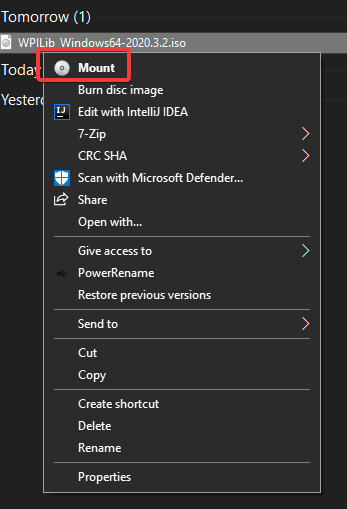
Windows 10 users can right click on the downloaded disk image and select Mount to open it. Then launch WPILibInstaller.exe.
Note
Other installed programs may associate with iso files and the mount option may not appear. If that software does not give the option to mount or extract the iso file, then follow the directions in the “Windows 7” tab.
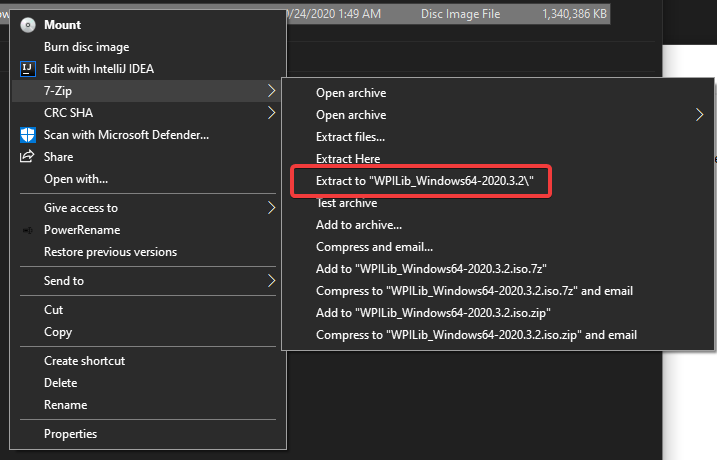
You can use 7-zip to extract the disk image by right-clicking, selecting 7-Zip and selecting Extract to…. Then launch WPILibInstaller.exe
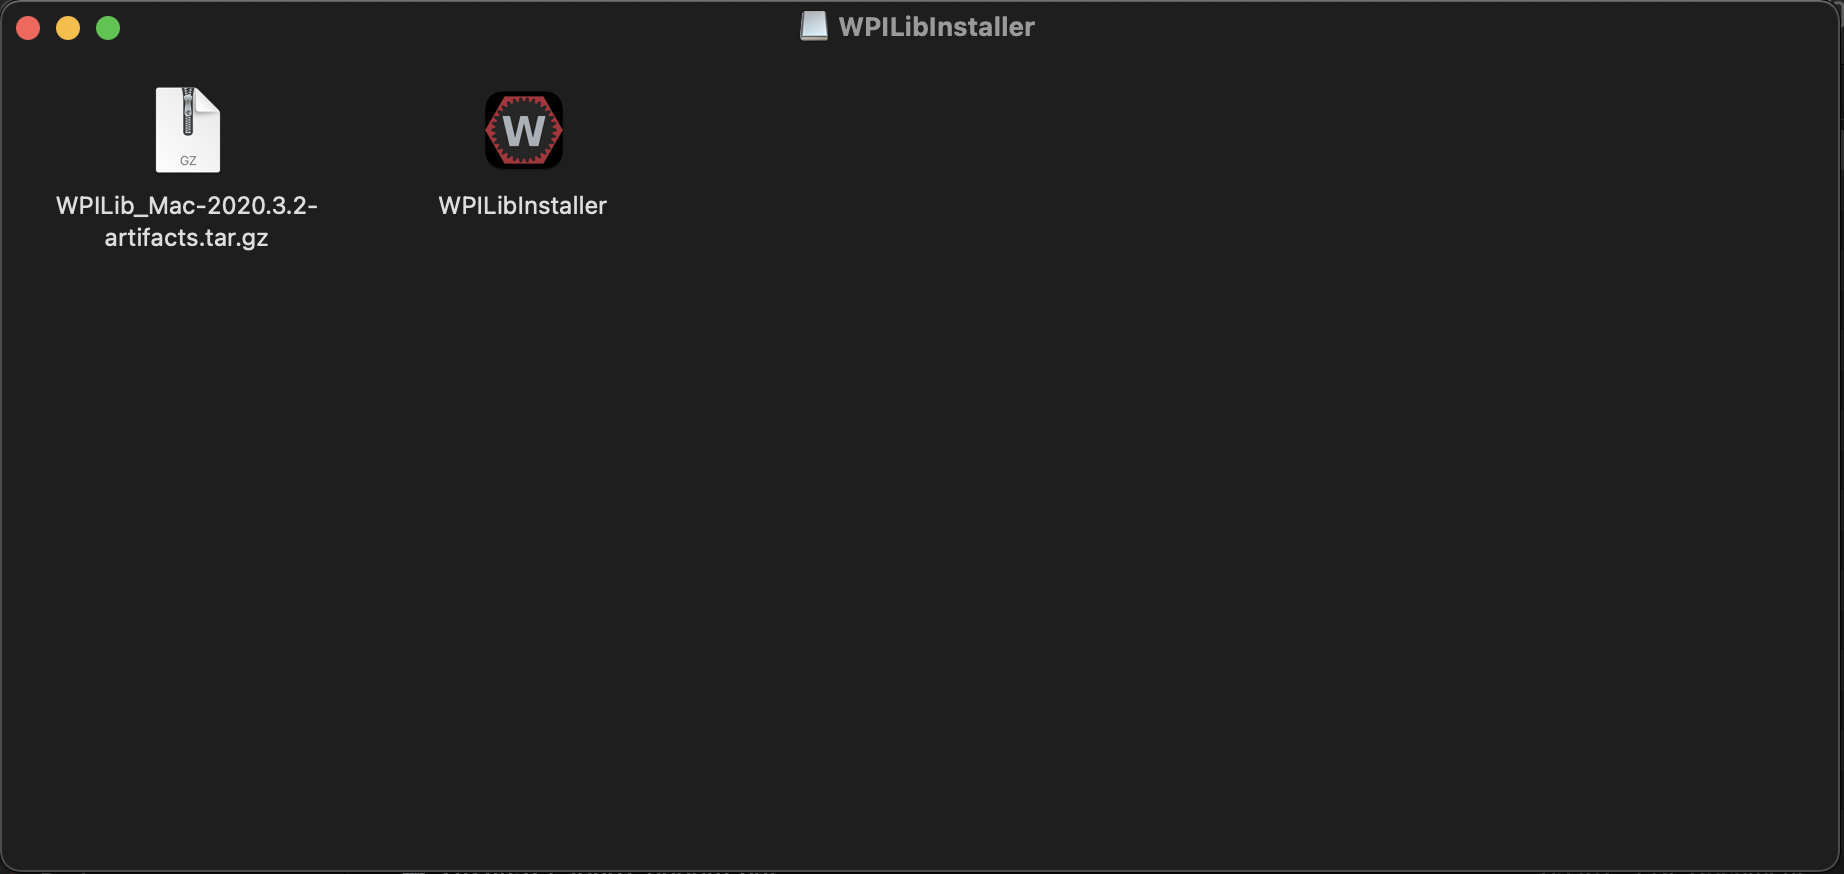
macOS users can double click on the downloaded DMG and then select WPILibInstaller to launch the application.
Linux users should extract the downloaded .tar.gz and then launch WPILibInstaller. Ubuntu treats executables in the file explorer as shared libraries, so double-clicking won’t run them. Run the following commands in a terminal instead with <version> replaced with the version you’re installing.
$ tar -xf WPILib_Linux-<version>.tar.gz
$ cd WPILib_Linux-<version>/
$ ./WPILibInstaller
Running the Installer
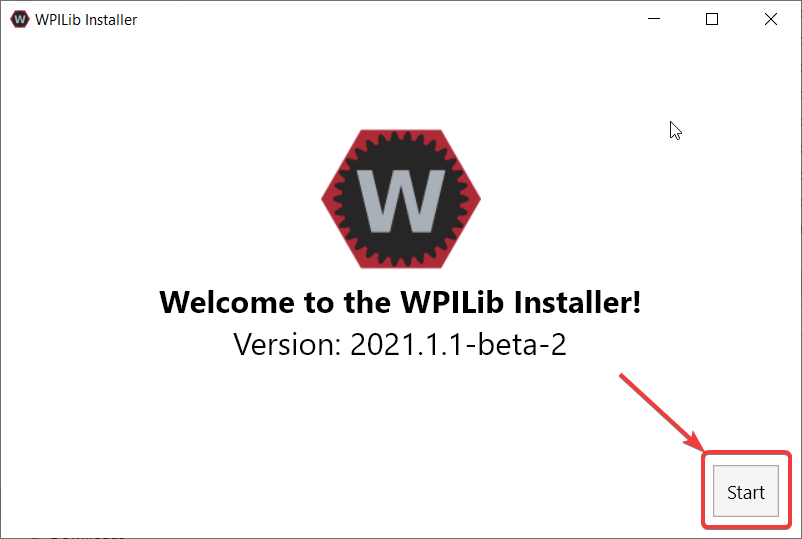
Upon opening the installer, you’ll be presented with the below screen. Go ahead and press Start.
This next screen involves downloading VS Code. Unfortunately, due to licensing reasons, VS Code can not be bundled with the installer.
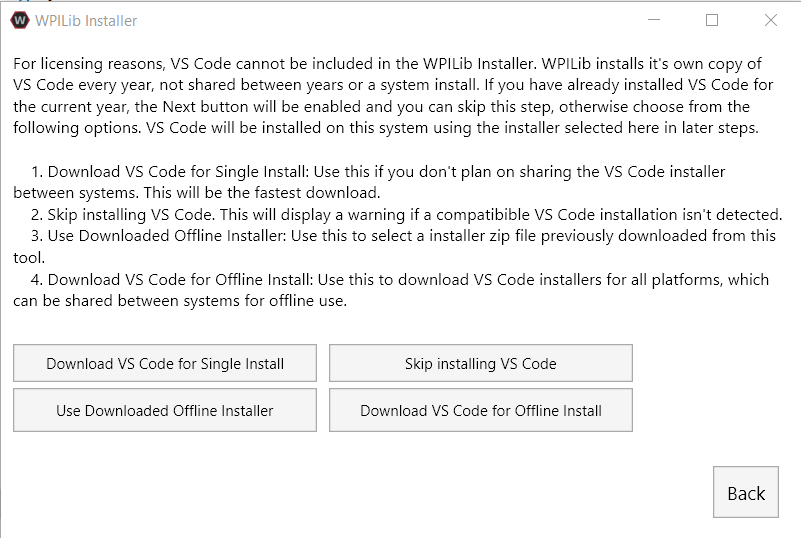
Download VS Code for Single Install
This downloads VS Code only for the current platform, which is also the smallest download.
Skip installing VS Code
Skips installing VS Code. Useful for advanced installations or configurations. Generally not recommended.
Use Downloaded Offline Installer
Selecting this option will bring up a prompt allowing you to select a pre-existing zip file of VS Code that has been downloaded by the installer previously. This option does not let you select an already installed copy of VS Code on your machine.
Download VS Code for Offline Install
This option downloads and saves a copy of VS Code for all platforms, which is useful for sharing the copy of the installer.
Go ahead and select Download VS Code for Single Install. This will begin the download process and can take a bit depending on internet connectivity (it’s ~60MB). Once the download is done, select Next. You should be presented with a screen that looks similar to the one below.
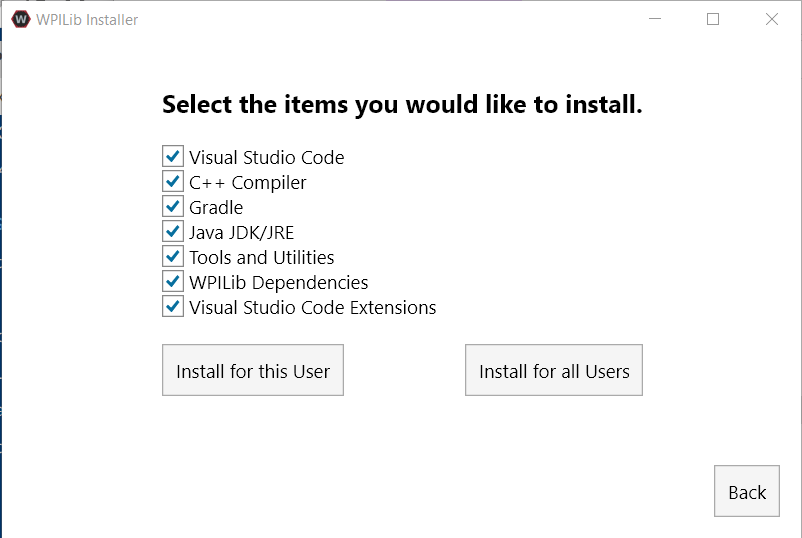
This showcases a list of options included with the WPILib installation. It’s advised to just leave the default options selected.
You will notice two buttons, Install for this User and Install for all Users. Install for this User only installs it on the current user account, and does not require administrator privileges. However, Install for all Users installs the tools for all system accounts and will require administrator access. Install for all Users is not an option for macOS and Linux.
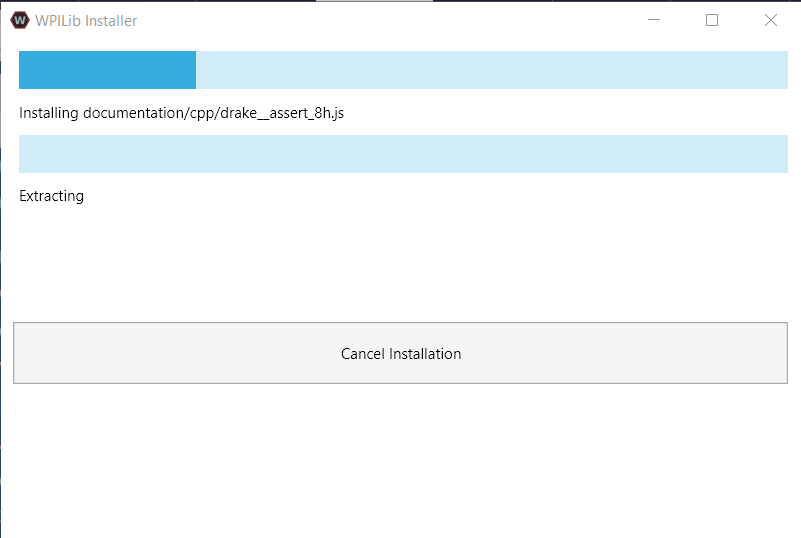
Select the option that is appropriate for you, and you’ll presented with the following installation screen.
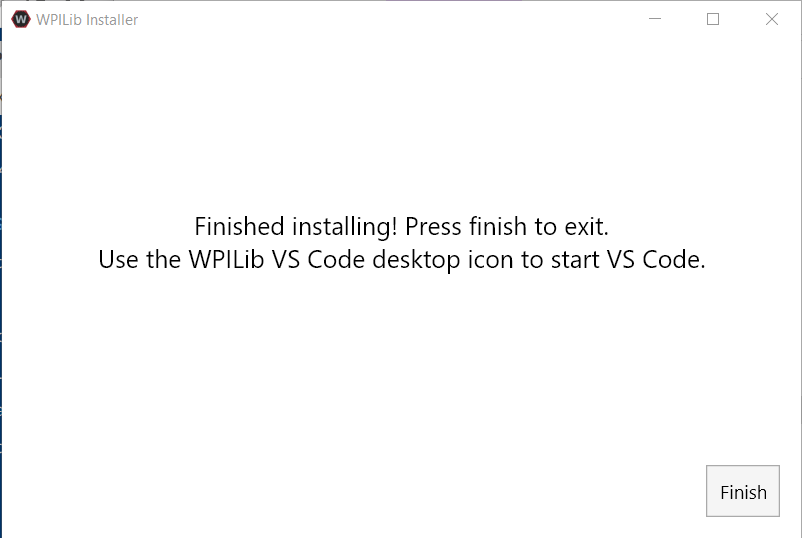
After installation is complete, you will be presented with the finished screen.
Important
WPILib installs a separate version of VS Code than into an already existing installation. Each year has it’s own copy of the tools appended with the year. IE: WPILib VS Code 2021. Please launch the WPILib VS Code and not a system installed copy!
Congratulations, the WPILib development environment and tooling is now installed on your computer! Press Finish to exit the installer.
Post-Installation
Some operating systems require some final action to complete installation.
After installation, the installer opens the WPILib VS Code folder. Drag the VS Code application to the dock. Eject WPILibInstaller image from the desktop.
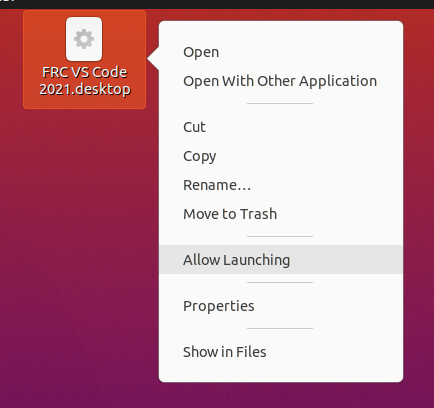
Some versions of Linux (e.g. Ubuntu 20.04) require you to give the desktop shortcut the ability to launch. Right click on the desktop icon and select Allow Launching.
Note
Installing desktop tools and rebooting will create a folder on the desktop called YYYY WPILib Tools, where YYYY is the current year. Desktop tool shortcuts are not available on Linux and MacOS.
What is Installed?
The Offline Installer installs the following components:
Visual Studio Code - The supported IDE for 2019 and later robot code development. The offline installer sets up a separate copy of VS Code for WPILib development, even if you already have VS Code on your machine. This is done because some of the settings that make the WPILib setup work may break existing workflows if you use VS Code for other projects.
C++ Compiler - The toolchains for building C++ code for the roboRIO
Gradle - The specific version of Gradle used for building/deploying C++ or Java robot code
Java JDK/JRE - A specific version of the Java JDK/JRE that is used to build Java robot code and to run any of the Java based Tools (Dashboards, etc.). This exists side by side with any existing JDK installs and does not overwrite the JAVA_HOME variable
WPILib Tools - SmartDashboard, Shuffleboard, RobotBuilder, Outline Viewer, Pathweaver, Glass
WPILib Dependencies - OpenCV, etc.
VS Code Extensions - WPILib extensions for robot code development in VS Code
Uninstalling
WPILib is designed to install to different folders for different years, so that it is not necessary to uninstall a previous version before installing this year’s WPILib. However, the following instructions can be used to uninstall WPILib if desired.
Delete the appropriate wpilib folder (2019:
c:\Users\Public\frc2019, 2020 and later:c:\Users\Public\wpilib\YYYYwhereYYYYis the year to uninstall)Delete the desktop icons at
C:\Users\Public\Public DesktopDelete the path environment variables.
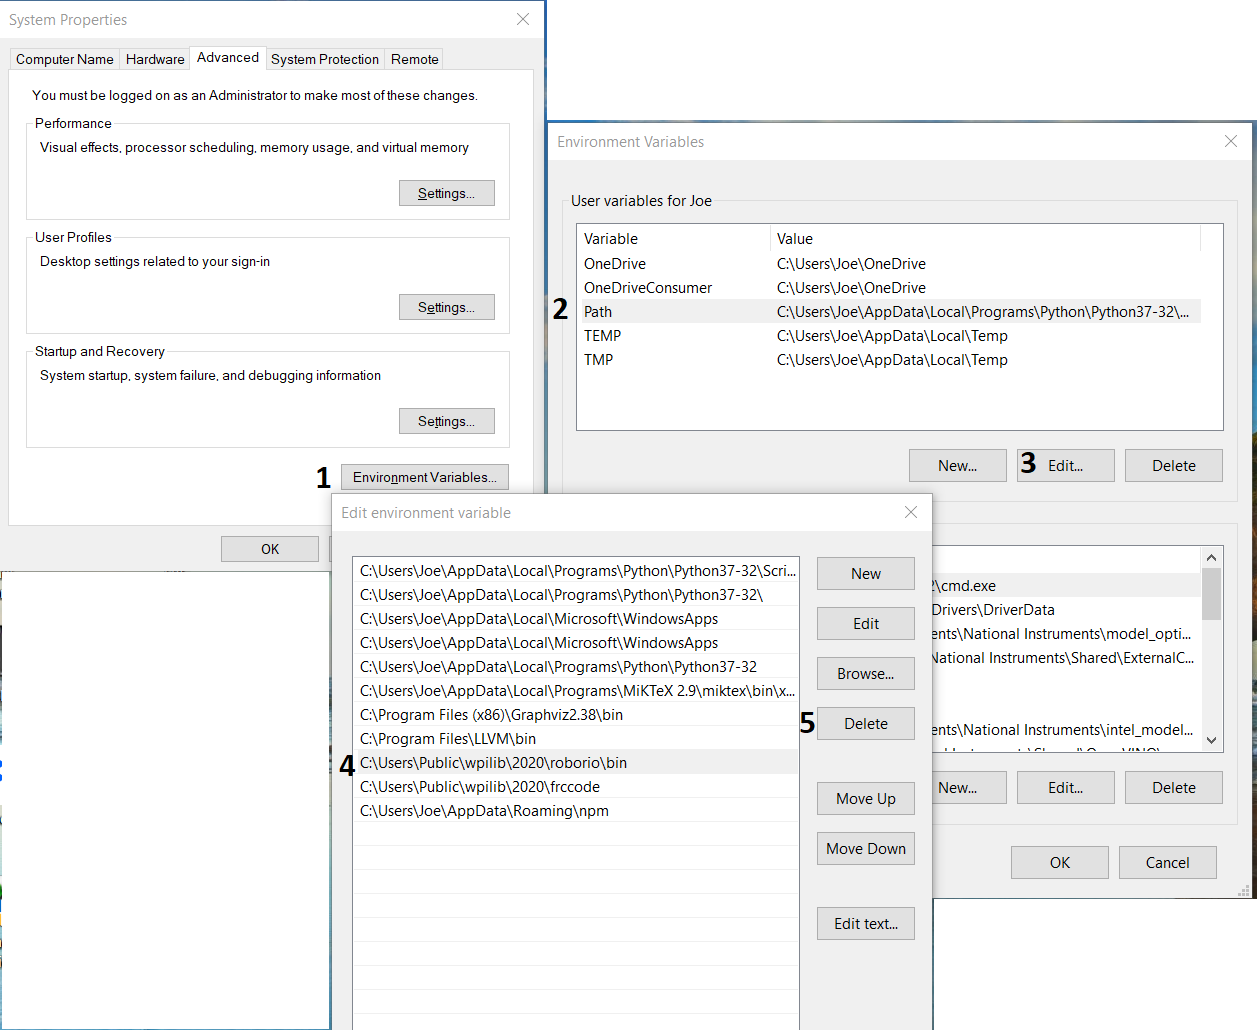
In the start menu, type environment and select “edit the system environment variables”
Click on the environment variables button (1).
In the user variables, select path (2) and then click on edit (3).
Select the path with
roborio\bin(4) and click on delete (5).Select the path with
frccodeand click on delete (5).Repeat steps 3-6 in the Systems Variable pane.
Delete the appropriate wpilib folder (2019:
~/frc2019, 2020 and later:~/wpilib/YYYYwhereYYYYis the year to uninstall)
Delete the appropriate wpilib folder (2019:
~/frc2019, 2020 and later:~/wpilib/YYYYwhereYYYYis the year to uninstall). egrm -rf ~/wpilib/YYYY