Using the CameraServer on the roboRIO
Simple CameraServer Program
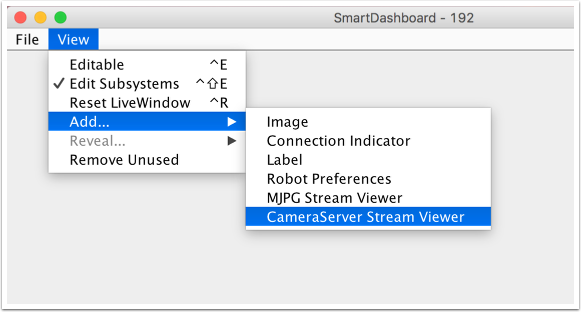
The following program starts automatic capture of a USB camera like the Microsoft LifeCam that is connected to the roboRIO. In this mode, the camera will capture frames and send them to the dashboard. To view the images, create a CameraServer Stream Viewer widget using the “View”, then “Add” menu in the dashboard. The images are unprocessed and just forwarded from the camera to the dashboard.
package org.usfirst.frc.team190.robot;

import edu.wpi.first.cameraserver.CameraServer;
import edu.wpi.first.wpilibj.IterativeRobot;

public class Robot extends IterativeRobot {

  public void robotInit() {
    CameraServer.getInstance().startAutomaticCapture();
  }
}
#include "cameraserver/CameraServer.h"
class Robot: public IterativeRobot
{
private:
  void RobotInit()
  {
    CameraServer::GetInstance()->StartAutomaticCapture();
  }
};
START_ROBOT_CLASS(Robot)
Advanced Camera Server Program
In the following example a thread created in robotInit() gets the Camera Server instance. Each frame of the video is individually processed, in this case converting a color image (BGR) to gray scale using the OpenCV cvtColor() method. The resultant images are then passed to the output stream and sent to the dashboard. You can replace the cvtColor operation with any image processing code that is necessary for your application. You can even annotate the image using OpenCV methods to write targeting information onto the image being sent to the dashboard.
package org.usfirst.frc.team190.robot;

import org.opencv.core.Mat;
import org.opencv.imgproc.Imgproc;

import edu.wpi.cscore.CvSink;
import edu.wpi.cscore.CvSource;
import edu.wpi.cscore.UsbCamera;
import edu.wpi.first.cameraserver.CameraServer;
import edu.wpi.first.wpilibj.IterativeRobot;

public class Robot extends IterativeRobot {

  public void robotInit() {
    new Thread(() -> {
      UsbCamera camera = CameraServer.getInstance().startAutomaticCapture();
      camera.setResolution(640, 480);

      CvSink cvSink = CameraServer.getInstance().getVideo();
      CvSource outputStream = CameraServer.getInstance().putVideo("Blur", 640, 480);

      Mat source = new Mat();
      Mat output = new Mat();

      while(!Thread.interrupted()) {
        if (cvSink.grabFrame(source) == 0) {
          continue;
        }
        Imgproc.cvtColor(source, output, Imgproc.COLOR_BGR2GRAY);
        outputStream.putFrame(output);
      }
    }).start();
  }
}
#include "cameraserver/CameraServer.h"
#include <opencv2/imgproc/imgproc.hpp>
#include <opencv2/core/core.hpp>
class Robot: public IterativeRobot
{
private:
  static void VisionThread()
  {
    cs::UsbCamera camera = CameraServer::GetInstance()->StartAutomaticCapture();
    camera.SetResolution(640, 480);
    cs::CvSink cvSink = CameraServer::GetInstance()->GetVideo();
    cs::CvSource outputStreamStd = CameraServer::GetInstance()->PutVideo("Gray", 640, 480);
    cv::Mat source;
    cv::Mat output;
    while(true) {
      if (cvSink.GrabFrame(source) == 0) {
        continue;
      }
      cvtColor(source, output, cv::COLOR_BGR2GRAY);
      outputStreamStd.PutFrame(output);
    }
  }
  void RobotInit()
  {
    std::thread visionThread(VisionThread);
    visionThread.detach();
  }
};
START_ROBOT_CLASS(Robot)
Notice that in these examples, the PutVideo() method writes the video to a named stream. To view that stream on Shuffleboard, select that named stream. In this case that is “Blur” for the Java program and “Gray” for the C++ sample.