RobotBuilder Created Code
The Layout of a RobotBuilder Generated Project
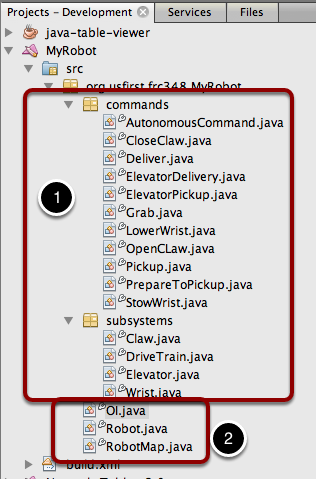
A RobotBuilder generated project consists of a package (in Java) or a folder (in C++) for Commands and another for Subsystems (1). Each command or subsystem object is stored under those containers (2). At the top level of the project you’ll find the robot main program (Robot.java), the Operator Interface file (OI.java) and the RobotMap that contains the code to create all the subsystem components that were added to the robot description.
Autogenerated Code
// BEGIN AUTOGENERATED CODE, SOURCE=ROBOTBUILDER ID=REQUIRES
requires(Robot.claw);
// END AUTOGENERATED CODE, SOURCE=ROBOTBUILDER ID=REQUIRES
setTimeout(1);
// BEGIN AUTOGENERATED CODE, SOURCE=ROBOTBUILDER ID=REQUIRES
Requires(Robot::claw);
// END AUTOGENERATED CODE, SOURCE=ROBOTBUILDER ID=REQUIRES
SetTimeout(1);
When the robot description is modified and code is re-exported RobotBuilder is designed to not modify any changes you made to the file, thus preserving your code. This makes RobotBuilder a full-lifecycle tool. To know what code is OK to be modified by RobotBuilder, it generates sections that will potentially have to be rewritten delimited with some special comments. These comments are shown in the example above. Don’t add any code within these comment blocks, it will be rewritten next time the project is exported from RobotBuilder.
If code inside one of these blocks must be modified, the comments can be removed, but this will prevent further updates from happening later. In the above example, if the //BEGIN and //END comments were removed, then later another required subsystem was added in RobotBuilder, it would not be generated on that next export.
Main Robot Program
12 13 14 15 16 17 18 19 20 21 22 23 24 25 26 27 28 29 30 31 32 33 34 35 36 37 38 39 40 41 42 43 44 45 46 47 48 49 50 51 52 53 54 55 56 57 58 59 60 61 62 63 64 65 66 | public class Robot extends TimedRobot { // (1)
Command autonomousCommand;
public static OI oi;
// BEGIN AUTOGENERATED CODE, SOURCE=ROBOTBUILDER ID=DECLARATIONS
public static Claw claw; // (2)
public static Wrist wrist;
public static DriveBase driveBase;
public static Elevator elevator;
// END AUTOGENERATED CODE, SOURCE=ROBOTBUILDER ID=DECLARATIONS
public void robotInit() { // (3)
RobotMap.init();
// BEGIN AUTOGENERATED CODE, SOURCE=ROBOTBUILDER ID=CONSTRUCTORS
claw = new Claw();
wrist = new Wrist();
driveBase = new DriveBase();
elevator = new Elevator();
// END AUTOGENERATED CODE, SOURCE=ROBOTBUILDER ID=CONSTRUCTORS
oi = new OI();
// BEGIN AUTOGENERATED CODE, SOURCE=ROBOTBUILDER ID=AUTONOMOUS
autonomousCommand = new AutonomousCommand();
// END AUTOGENERAETED CODE, SOURCE=ROBOTBUILDER ID=AUTONOMOUS
}
public void disableInit() {}
public void disabledPeriodic() {
Scheduler.getInstance().run();
}
public void autonomousInit() { // (4)
// Schedule the autonomous command (example)
if (autonomousCommand != null) autonomousCommand.start();
}
public void autonomousPeriodic() { // (5)
Scheduler.getInstance().run();
}
public void teleopInit() {
if (autonomousCommand != null) autonomousCommand.cancel();
}
public void teleopPeriodic() {
Scheduler.getInstance().run()
}
public void testPeriodic() { // (6)
LiveWindow.run()
}
}
|
This is the main program generated by RobotBuilder. There are a number of parts to this program (highlighted sections):
This class extends TimedRobot. TimedRobot will call your
autonomousPeriodic()andteleopPeriodic()methods every 20ms.Each of the subsystems is declared here. These are public static variables so that they can be referenced from throughout your robot program by writing Robot.<subsystem-name>.method(), for example
Robot.elevator.setSetpoint(4).The subsystems are instantiated in the robotInit() method that is called after the constructor runs for this class. It is important to be create the subsystems after the constructor to avoid recursive loops. Also instance of the
OI()class (for your operator interface) and the autonomous command are created here.In the
autonomousInit()method which is called every20ms, make one scheduling pass. That will call theisFinished()andexecute()methods of every command that is currently scheduled.If there is an autonomous command provided in RobotBuilder robot properties, it is scheduled at the start of autonomous in the
autonomousInit()method and canceled at the end of the autonomous period inteleopInit().In the teleopPeriodic method which is called every 20ms, make one scheduling pass.
RobotMap - Generation of Actuator and Sensor Objects
public class RobotMap {
    public static Jaguar DRIVE_TRAIN_LEFT_MOTOR;    // (1)
    public static Jaguar DRIVE_TRAIN_RIGHT_MOTOR;
    public static RobotDrive DRIVE_TRAIN_ROBOT_DRIVE;
    public static Ultrasonic DRIVE_TRAIN_ULTRASONIC;
    public static Victor ELEVATOR_MOTOR;
    public static AnalogChannel ELEVATOR_POTENTIOMETER;
    public static AnalogChannel WRIST_POTENTIOMETER;
    public static Victor WRIST_MOTOR;
    public static Victor CLAW_MOTOR;

    public static void init() {
        DRIVE_TRAIN_LEFT_MOTOR = new Jaguar(1, 2);
        LiveWindow.addActuator("Drive Train ", "Left Motor", DRIVE_TRAIN_LEFT_MOTOR);

        DRIVE_TRAIN_RIGHT_MOTOR = new Jaguar(1, 2);    // (2)
        LiveWindow.addActuator("Drive Train ", "Right Motor", DRIVE_TRAIN_RIGHT_MOTOR);

        DRIVE_TRAIN_ROBOT_DRIVE = new RobotDrive(DRIVE_TRAIN_LEFT_MOTOR, DRIVE_TRAIN_RIGHT_MOTOR);

        DRIVE_TRAIN_ROBOT_DRIVE.setSafetyEnabled(false);    // (3)
        DRIVE_TRAIN_ROBOT_DRIVE.setExpiration(0.1);
        DRIVE_TRAIN_ROBOT_DRIVE.setSensitivity(0.5);
        DRIVE_TRAIN_ROBOT_DRIVE.setMaxOutput(1.0);

        DRIVE_TRAIN_ULTRASONIC = new Ultrasonic(1, 3);

        ELEVATOR_MOTOR = new Victor(1, 6);
        LiveWindow.addActuator("Elevator ", "Motor", ELEVATOR_MOTOR);

        ELEVATOR_POTENTIOMETER = new AnalogChannel(1, 4);
        LiveWindow.addSensor("Elevator ", "Potentiometer", ELEVATOR_POTENTIOMETER)

        WRIST_POTENTIOMETER = new AnalogChannel(1, 2);
        LiveWindow.addSensor("Wrist ", "Potentiometer", WRIST_POTENTIOMETER)

        WRIST_MOTOR = new Victor(1, 5);
        LiveWindow.addActuator("Wrist ", "Motor", WRIST_MOTOR);

        CLAW_MOTOR = new Victor(1, 7);
        LiveWindow.addActuator("Claw ", "Motor", CLAW_MOTOR);
    }
}
The RobotMap is a mapping from the ports sensors and actuators are wired into to a variable name. This provides flexibility changing wiring, makes checking the wiring easier and significantly reduces the number of magic numbers floating around. All the definitions of sensors and motors from the robot description are generated here.
Notice that each sensor and actuator is added to the LiveWindow class (3) so that the can be automatically displayed when the SmartDashboard is set to LiveWindow mode. Also any properties for the particular sensor or actuator is set here to reflect the settings made in the robot description. (1)
Each of the references for the objects are declared and instantiated here (2, 3), but they are copied into every subsystem to make it easy and clean to write code that uses them.
OI Class - The Operator Interface
public class OI {
    // BEGIN AUTOGENERATED CODE, SOURCE=ROBOTBUILDER ID=DECLARATIONS
    public JoystickButton joystickButton;
    public JoystickButton joystickButton2;
    public Joystick gamePad;
    // END AUTOGENERATED CODE, SOURCE=ROBOTBUILDER ID=DECLARATIONS

    public OI() {
        // BEGIN AUTOGENERATED CODE, SOURCE=ROBOTBUILDER ID=CONSTRUCTORS
        gamePad = new Joystick(1);    // (1)

        joystickButton = new JoystickButton(gamePad, 1);    // (2)
        joystickButton.whenPressed(new OpenClaw());
        joystickButton2 = new JoystickButton(gamePad, 2);
        joystickButton2.whenPressed(new CloseClaw());

        // END AUTOGENERATED CODE, SOURCE=ROBOTBUILDER ID=CONSTRUCTORS
    }
}
The code for all the operator interface components is generated here (1). In addition the code to link the OI buttons to commands that should run is also generated here (2).