Organizing Widgets
Setting Widget Size and Position
Call withSize and withPosition to set the size and position of the widget in the tab.
withSize sets the number of columns wide and rows high the widget should be. For example, calling withSize(1, 1) makes the widget occupy a single cell in the grid. Note that some widgets have a minimum size that may be greater than the specified size, in which case the widget will use the smallest supported size.
withPosition sets the row and column of the top-left corner of the widget. Rows and columns are both 0-indexed, so the topmost row is number 0 and the leftmost column is also number 0. If the position of any widget in a tab is specified, every widget should also have its position set to avoid overlapping widgets.
Shuffleboard.getTab("Pre-round")
  .add("Auto Mode", autoModeChooser)
  .withSize(2, 1) // make the widget 2x1
  .withPosition(0, 0); // place it in the top-left corner
frc::Shuffleboard::GetTab("Pre-round")
  .Add("Auto Mode", autoModeChooser)
  .WithSize(2, 1)
  .WithPosition(0,0);
Adding Widgets to Layouts
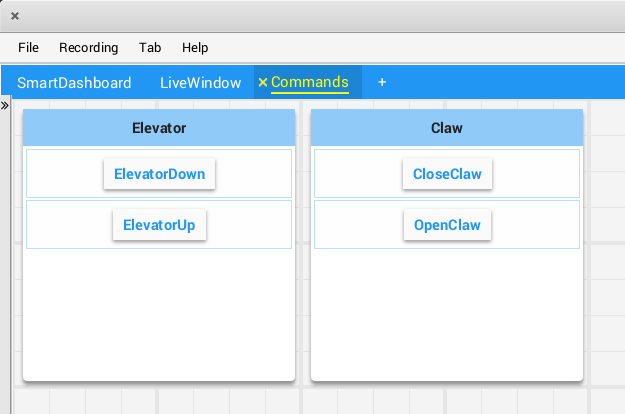
If there are many widgets in a tab with related data, it can be useful to place them into smaller subgroups instead of loose in the tab. Much like how the handle to a tab is retrieved with Shuffleboard.getTab, a layout inside a tab (or even in another layout) can be retrieved with ShuffleboardTab.getLayout.
ShuffleboardLayout elevatorCommands = Shuffleboard.getTab("Commands")
  .getLayout("Elevator", BuiltInLayouts.kList)
  .withSize(2, 2)
  .withProperties(Map.of("Label position", "HIDDEN")); // hide labels for commands

elevatorCommands.add(new ElevatorDownCommand());
elevatorCommands.add(new ElevatorUpCommand());
// Similarly for the claw commands
wpi::StringMap<std::shared_ptr<nt::Value>> properties{
  std::make_pair("Label position", nt::Value::MakeString("HIDDEN"))
};

frc::ShuffleboardLayout& elevatorCommands = frc::Shuffleboard::GetTab("Commands")
  .GetLayout("Elevator", frc::BuiltInLayouts::kList)
  .WithSize(2, 2)
  .WithProperties(properties);

ElevatorDownCommand* elevatorDown = new ElevatorDownCommand();
ElevatorUpCommand* elevatorUp = new ElevatorUpCommand();

elevatorCommands.Add("Elevator Down", elevatorDown);
elevatorCommands.Add("Elevator Up", elevatorUp);
