RobotBuilder Created Code
The Layout of a RobotBuilder Generated Project

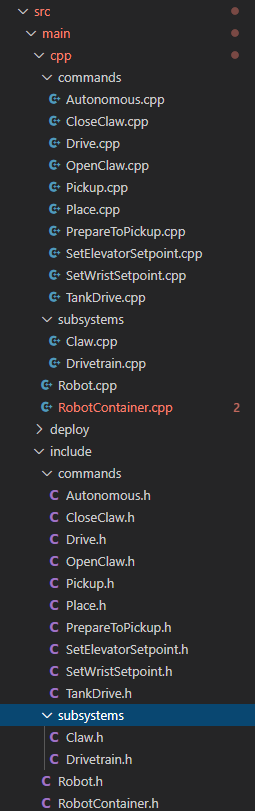
A RobotBuilder generated project consists of a package (in Java) or a folder (in C++) for Commands and another for Subsystems. Each command or subsystem object is stored under those containers. At the top level of the project you’ll find the robot main program (RobotContainer.java/C++).
For more information on the organization of a Command Based robot, see Structuring a Command-Based Robot Project
Autogenerated Code
// BEGIN AUTOGENERATED CODE, SOURCE=ROBOTBUILDER ID=AUTONOMOUS
m_chooser.setDefaultOption("Autonomous", new Autonomous());
// END AUTOGENERATED CODE, SOURCE=ROBOTBUILDER ID=AUTONOMOUS

SmartDashboard.putData("Auto Mode", m_chooser);
// BEGIN AUTOGENERATED CODE, SOURCE=ROBOTBUILDER ID=AUTONOMOUS
m_chooser.SetDefaultOption("Autonomous", new Autonomous());
// END AUTOGENERATED CODE, SOURCE=ROBOTBUILDER ID=AUTONOMOUS

frc::SmartDashboard::PutData("Auto Mode", &m_chooser);
When the robot description is modified and code is re-exported RobotBuilder is designed to not modify any changes you made to the file, thus preserving your code. This makes RobotBuilder a full-lifecycle tool. To know what code is OK to be modified by RobotBuilder, it generates sections that will potentially have to be rewritten delimited with some special comments. These comments are shown in the example above. Don’t add any code within these comment blocks, it will be rewritten next time the project is exported from RobotBuilder.
If code inside one of these blocks must be modified, the comments can be removed, but this will prevent further updates from happening later. In the above example, if the //BEGIN and //END comments were removed, then later another required subsystem was added in RobotBuilder, it would not be generated on that next export.
// ROBOTBUILDER TYPE: Robot.
// ROBOTBUILDER TYPE: Robot.
Additionally, each file has a comment defining the type of file. If this is modified or deleted, RobotBuilder will completely regenerate the file deleting any code added both inside and outside the AUTOGENERATED CODE blocks.
Main Robot Program
 11// ROBOTBUILDER TYPE: Robot.
 12
 13package frc.robot;
 14
 15import edu.wpi.first.hal.FRCNetComm.tInstances;
 16import edu.wpi.first.hal.FRCNetComm.tResourceType;
 17import edu.wpi.first.hal.HAL;
 18import edu.wpi.first.wpilibj.TimedRobot;
 19import edu.wpi.first.wpilibj2.command.Command;
 20import edu.wpi.first.wpilibj2.command.CommandScheduler;
 21
 22/**
 23 * The VM is configured to automatically run this class, and to call the
 24 * functions corresponding to each mode, as described in the TimedRobot
 25 * documentation. If you change the name of this class or the package after
 26 * creating this project, you must also update the build.properties file in
 27 * the project.
 28 */
 29public class Robot extends TimedRobot { // (1)
 30
 31    private Command m_autonomousCommand;
 32
 33    private RobotContainer m_robotContainer;
 34
 35    /**
 36     * This function is run when the robot is first started up and should be
 37     * used for any initialization code.
 38     */
 39    @Override
 40    public void robotInit() {
 41        // Instantiate our RobotContainer.  This will perform all our button bindings, and put our
 42        // autonomous chooser on the dashboard.
 43        m_robotContainer = RobotContainer.getInstance();
 44        HAL.report(tResourceType.kResourceType_Framework, tInstances.kFramework_RobotBuilder);
 45    }
 46
 47    /**
 48    * This function is called every robot packet, no matter the mode. Use this for items like
 49    * diagnostics that you want ran during disabled, autonomous, teleoperated and test.
 50    *
 51    * <p>This runs after the mode specific periodic functions, but before
 52    * LiveWindow and SmartDashboard integrated updating.
 53    */
 54    @Override
 55    public void robotPeriodic() {
 56        // Runs the Scheduler.  This is responsible for polling buttons, adding newly-scheduled
 57        // commands, running already-scheduled commands, removing finished or interrupted commands,
 58        // and running subsystem periodic() methods.  This must be called from the robot's periodic
 59        // block in order for anything in the Command-based framework to work.
 60        CommandScheduler.getInstance().run();  // (2)
 61    }
 62
 63
 64    /**
 65    * This function is called once each time the robot enters Disabled mode.
 66    */
 67    @Override
 68    public void disabledInit() {
 69    }
 70
 71    @Override
 72    public void disabledPeriodic() {
 73    }
 74
 75    /**
 76    * This autonomous runs the autonomous command selected by your {@link RobotContainer} class.
 77    */
 78    @Override
 79    public void autonomousInit() {
 80        m_autonomousCommand = m_robotContainer.getAutonomousCommand();  // (3)
 81
 82        // schedule the autonomous command (example)
 83        if (m_autonomousCommand != null) {
 84            m_autonomousCommand.schedule();
 85        }
 86    }
 87
 88    /**
 89    * This function is called periodically during autonomous.
 90    */
 91    @Override
 92    public void autonomousPeriodic() {
 93    }
 94
 95    @Override
 96    public void teleopInit() {
 97        // This makes sure that the autonomous stops running when
 98        // teleop starts running. If you want the autonomous to
 99        // continue until interrupted by another command, remove
100        // this line or comment it out.
101        if (m_autonomousCommand != null) {
102            m_autonomousCommand.cancel();
103        }
104    }
105
106    /**
107     * This function is called periodically during operator control.
108     */
109    @Override
110    public void teleopPeriodic() {
111    }
112
113    @Override
114    public void testInit() {
115        // Cancels all running commands at the start of test mode.
116        CommandScheduler.getInstance().cancelAll();
117    }
118
119    /**
120    * This function is called periodically during test mode.
121    */
122    @Override
123    public void testPeriodic() {
124    }
125
126}
11// ROBOTBUILDER TYPE: Robot.
12#pragma once
13
14#include <frc/TimedRobot.h>
15#include <frc2/command/Command.h>
16
17#include "RobotContainer.h"
18
19class Robot : public frc::TimedRobot { // {1}
20 public:
21  void RobotInit() override;
22  void RobotPeriodic() override;
23  void DisabledInit() override;
24  void DisabledPeriodic() override;
25  void AutonomousInit() override;
26  void AutonomousPeriodic() override;
27  void TeleopInit() override;
28  void TeleopPeriodic() override;
29  void TestPeriodic() override;
30
31 private:
32  // Have it null by default so that if testing teleop it
33  // doesn't have undefined behavior and potentially crash.
34  frc2::Command* m_autonomousCommand = nullptr;
35
36  RobotContainer* m_container = RobotContainer::GetInstance();
37};
11// ROBOTBUILDER TYPE: Robot.
12
13#include "Robot.h"
14
15#include <frc/smartdashboard/SmartDashboard.h>
16#include <frc2/command/CommandScheduler.h>
17
18void Robot::RobotInit() {}
19
20/**
21 * This function is called every robot packet, no matter the mode. Use
22 * this for items like diagnostics that you want to run during disabled,
23 * autonomous, teleoperated and test.
24 *
25 * <p> This runs after the mode specific periodic functions, but before
26 * LiveWindow and SmartDashboard integrated updating.
27 */
28void Robot::RobotPeriodic() { frc2::CommandScheduler::GetInstance().Run(); } // (2)
29
30/**
31 * This function is called once each time the robot enters Disabled mode. You
32 * can use it to reset any subsystem information you want to clear when the
33 * robot is disabled.
34 */
35void Robot::DisabledInit() {}
36
37void Robot::DisabledPeriodic() {}
38
39/**
40 * This autonomous runs the autonomous command selected by your {@link
41 * RobotContainer} class.
42 */
43void Robot::AutonomousInit() {
44  m_autonomousCommand = m_container->GetAutonomousCommand(); // {3}
45
46  if (m_autonomousCommand != nullptr) {
47    m_autonomousCommand->Schedule();
48  }
49}
50
51void Robot::AutonomousPeriodic() {}
52
53void Robot::TeleopInit() {
54  // This makes sure that the autonomous stops running when
55  // teleop starts running. If you want the autonomous to
56  // continue until interrupted by another command, remove
57  // this line or comment it out.
58  if (m_autonomousCommand != nullptr) {
59    m_autonomousCommand->Cancel();
60    m_autonomousCommand = nullptr;
61  }
62}
63
64/**
65 * This function is called periodically during operator control.
66 */
67void Robot::TeleopPeriodic() {}
68
69/**
70 * This function is called periodically during test mode.
71 */
72void Robot::TestPeriodic() {}
73
74#ifndef RUNNING_FRC_TESTS
75int main() { return frc::StartRobot<Robot>(); }
76#endif
This is the main program generated by RobotBuilder. There are a number of parts to this program (highlighted sections):
This class extends TimedRobot. TimedRobot will call your
autonomousPeriodic()andteleopPeriodic()methods every 20ms.In the robotPeriodic method which is called every 20ms, make one scheduling pass.
The autonomous command provided is scheduled at the start of autonomous in the
autonomousInit()method and canceled at the end of the autonomous period inteleopInit().
RobotContainer
 11// ROBOTBUILDER TYPE: RobotContainer.
 12
 13package frc.robot;
 14
 15import frc.robot.commands.*;
 16import frc.robot.subsystems.*;
 17import edu.wpi.first.wpilibj.smartdashboard.SendableChooser;
 18import edu.wpi.first.wpilibj.smartdashboard.SmartDashboard;
 19
 20// BEGIN AUTOGENERATED CODE, SOURCE=ROBOTBUILDER ID=IMPORTS
 21import edu.wpi.first.wpilibj2.command.Command;
 22import edu.wpi.first.wpilibj2.command.InstantCommand;
 23import edu.wpi.first.wpilibj.Joystick;
 24import edu.wpi.first.wpilibj2.command.button.JoystickButton;
 25import frc.robot.subsystems.*;
 26
 27    // END AUTOGENERATED CODE, SOURCE=ROBOTBUILDER ID=IMPORTS
 28
 29
 30/**
 31 * This class is where the bulk of the robot should be declared.  Since Command-based is a
 32 * "declarative" paradigm, very little robot logic should actually be handled in the {@link Robot}
 33 * periodic methods (other than the scheduler calls).  Instead, the structure of the robot
 34 * (including subsystems, commands, and button mappings) should be declared here.
 35 */
 36public class RobotContainer {
 37
 38  private static RobotContainer m_robotContainer = new RobotContainer();
 39
 40    // BEGIN AUTOGENERATED CODE, SOURCE=ROBOTBUILDER ID=DECLARATIONS
 41// The robot's subsystems
 42    public final Wrist m_wrist = new Wrist(); // {1}
 43    public final Elevator m_elevator = new Elevator();
 44    public final Claw m_claw = new Claw();
 45    public final Drivetrain m_drivetrain = new Drivetrain();
 46
 47// Joysticks
 48private final Joystick joystick2 = new Joystick(2); // {3}
 49private final Joystick joystick1 = new Joystick(1);
 50private final Joystick logitechController = new Joystick(0);
 51
 52    // END AUTOGENERATED CODE, SOURCE=ROBOTBUILDER ID=DECLARATIONS
 53
 54
 55  // A chooser for autonomous commands
 56  SendableChooser<Command> m_chooser = new SendableChooser<>();
 57
 58  /**
 59  * The container for the robot.  Contains subsystems, OI devices, and commands.
 60  */
 61  private RobotContainer() {
 62        // BEGIN AUTOGENERATED CODE, SOURCE=ROBOTBUILDER ID=SMARTDASHBOARD
 63    // Smartdashboard Subsystems
 64    SmartDashboard.putData(m_wrist);
 65    SmartDashboard.putData(m_elevator);
 66    SmartDashboard.putData(m_claw);
 67    SmartDashboard.putData(m_drivetrain);
 68
 69
 70    // SmartDashboard Buttons
 71    SmartDashboard.putData("Close Claw", new CloseClaw( m_claw )); // {6}
 72    SmartDashboard.putData("Open Claw: OpenTime", new OpenClaw(1.0, m_claw));
 73    SmartDashboard.putData("Pickup", new Pickup());
 74    SmartDashboard.putData("Place", new Place());
 75    SmartDashboard.putData("Prepare To Pickup", new PrepareToPickup());
 76    SmartDashboard.putData("Set Elevator Setpoint: Bottom", new SetElevatorSetpoint(0, m_elevator));
 77    SmartDashboard.putData("Set Elevator Setpoint: Platform", new SetElevatorSetpoint(0.2, m_elevator));
 78    SmartDashboard.putData("Set Elevator Setpoint: Top", new SetElevatorSetpoint(0.3, m_elevator));
 79    SmartDashboard.putData("Set Wrist Setpoint: Horizontal", new SetWristSetpoint(0, m_wrist));
 80    SmartDashboard.putData("Set Wrist Setpoint: Raise Wrist", new SetWristSetpoint(-45, m_wrist));
 81    SmartDashboard.putData("Drive: Straight3Meters", new Drive(3, 0, m_drivetrain));
 82    SmartDashboard.putData("Drive: Place", new Drive(Drivetrain.PlaceDistance, Drivetrain.BackAwayDistance, m_drivetrain));
 83
 84    // END AUTOGENERATED CODE, SOURCE=ROBOTBUILDER ID=SMARTDASHBOARD
 85    // Configure the button bindings
 86    configureButtonBindings();
 87
 88    // Configure default commands
 89        // BEGIN AUTOGENERATED CODE, SOURCE=ROBOTBUILDER ID=SUBSYSTEM_DEFAULT_COMMAND
 90    m_drivetrain.setDefaultCommand(new TankDrive( m_drivetrain ) ); // {5}
 91
 92
 93    // END AUTOGENERATED CODE, SOURCE=ROBOTBUILDER ID=SUBSYSTEM_DEFAULT_COMMAND
 94
 95    // Configure autonomous sendable chooser
 96        // BEGIN AUTOGENERATED CODE, SOURCE=ROBOTBUILDER ID=AUTONOMOUS
 97
 98    m_chooser.setDefaultOption("Autonomous", new Autonomous()); // {2}
 99
100    // END AUTOGENERATED CODE, SOURCE=ROBOTBUILDER ID=AUTONOMOUS
101
102    SmartDashboard.putData("Auto Mode", m_chooser);
103  }
104
105  public static RobotContainer getInstance() {
106    return m_robotContainer;
107  }
108
109  /**
110   * Use this method to define your button->command mappings.  Buttons can be created by
111   * instantiating a {@link GenericHID} or one of its subclasses ({@link
112   * edu.wpi.first.wpilibj.Joystick} or {@link XboxController}), and then passing it to a
113   * {@link edu.wpi.first.wpilibj2.command.button.JoystickButton}.
114   */
115  private void configureButtonBindings() {
116        // BEGIN AUTOGENERATED CODE, SOURCE=ROBOTBUILDER ID=BUTTONS
117// Create some buttons
118final JoystickButton r1 = new JoystickButton(logitechController, 12);        // {4}
119r1.whenPressed(new Autonomous() ,true);
120    SmartDashboard.putData("R1",new Autonomous() );
121
122final JoystickButton l1 = new JoystickButton(logitechController, 11);
123l1.whenPressed(new Place() ,true);
124    SmartDashboard.putData("L1",new Place() );
125
126final JoystickButton r2 = new JoystickButton(logitechController, 10);
127r2.whenPressed(new Pickup() ,true);
128    SmartDashboard.putData("R2",new Pickup() );
129
130final JoystickButton l2 = new JoystickButton(logitechController, 9);
131l2.whenPressed(new PrepareToPickup() ,true);
132    SmartDashboard.putData("L2",new PrepareToPickup() );
133
134final JoystickButton dpadLeft = new JoystickButton(logitechController, 8);
135dpadLeft.whenPressed(new OpenClaw(1.0, m_claw) ,true);
136    SmartDashboard.putData("Dpad Left",new OpenClaw(1.0, m_claw) );
137
138final JoystickButton dpadRight = new JoystickButton(logitechController, 6);
139dpadRight.whenPressed(new CloseClaw( m_claw ) ,true);
140    SmartDashboard.putData("Dpad Right",new CloseClaw( m_claw ) );
141
142final JoystickButton dpadDown = new JoystickButton(logitechController, 7);
143dpadDown.whenPressed(new SetElevatorSetpoint(0, m_elevator) ,true);
144    SmartDashboard.putData("Dpad Down",new SetElevatorSetpoint(0, m_elevator) );
145
146final JoystickButton dpadUp = new JoystickButton(logitechController, 5);
147dpadUp.whenPressed(new SetElevatorSetpoint(0.3, m_elevator) ,true);
148    SmartDashboard.putData("Dpad Up",new SetElevatorSetpoint(0.3, m_elevator) );
149
150
151
152    // END AUTOGENERATED CODE, SOURCE=ROBOTBUILDER ID=BUTTONS
153  }
154
155    // BEGIN AUTOGENERATED CODE, SOURCE=ROBOTBUILDER ID=FUNCTIONS
156public Joystick getLogitechController() {
157        return logitechController;
158    }
159
160public Joystick getJoystick1() {
161        return joystick1;
162    }
163
164public Joystick getJoystick2() {
165        return joystick2;
166    }
167
168
169    // END AUTOGENERATED CODE, SOURCE=ROBOTBUILDER ID=FUNCTIONS
170
171  /**
172   * Use this to pass the autonomous command to the main {@link Robot} class.
173   *
174   * @return the command to run in autonomous
175  */
176  public Command getAutonomousCommand() {
177    // The selected command will be run in autonomous
178    return m_chooser.getSelected();
179  }
180
181
182}
11// ROBOTBUILDER TYPE: RobotContainer.
12
13#pragma once
14
15// BEGIN AUTOGENERATED CODE, SOURCE=ROBOTBUILDER ID=INCLUDES
16#include <frc/smartdashboard/SendableChooser.h>
17#include <frc2/command/Command.h>
18
19#include "subsystems/Claw.h"
20#include "subsystems/Drivetrain.h"
21#include "subsystems/Elevator.h"
22#include "subsystems/Wrist.h"
23
24#include "commands/Autonomous.h"
25#include "commands/CloseClaw.h"
26#include "commands/Drive.h"
27#include "commands/OpenClaw.h"
28#include "commands/Pickup.h"
29#include "commands/Place.h"
30#include "commands/PrepareToPickup.h"
31#include "commands/SetElevatorSetpoint.h"
32#include "commands/SetWristSetpoint.h"
33#include "commands/TankDrive.h"
34#include <frc/Joystick.h>
35#include <frc2/command/button/JoystickButton.h>
36
37// END AUTOGENERATED CODE, SOURCE=ROBOTBUILDER ID=INCLUDES
38
39class RobotContainer {
40
41public:
42
43    frc2::Command* GetAutonomousCommand();
44    static RobotContainer* GetInstance();
45
46    // BEGIN AUTOGENERATED CODE, SOURCE=ROBOTBUILDER ID=PROTOTYPES
47// The robot's subsystems
48Drivetrain m_drivetrain; // {1}
49Claw m_claw;
50Elevator m_elevator;
51Wrist m_wrist;
52
53
54frc::Joystick* getJoystick2();
55frc::Joystick* getJoystick1();
56frc::Joystick* getLogitechController();
57
58    // END AUTOGENERATED CODE, SOURCE=ROBOTBUILDER ID=PROTOTYPES
59
60private:
61
62    RobotContainer();
63
64    // BEGIN AUTOGENERATED CODE, SOURCE=ROBOTBUILDER ID=DECLARATIONS
65// Joysticks
66frc::Joystick m_joystick2{2}; // {3}
67frc::Joystick m_joystick1{1};
68frc::Joystick m_logitechController{0};
69
70frc::SendableChooser<frc2::Command*> m_chooser;
71
72    // END AUTOGENERATED CODE, SOURCE=ROBOTBUILDER ID=DECLARATIONS
73
74Autonomous m_autonomousCommand;
75    static RobotContainer* m_robotContainer;
76
77    void ConfigureButtonBindings();
78};
 11// ROBOTBUILDER TYPE: RobotContainer.
 12
 13#include "RobotContainer.h"
 14#include <frc2/command/ParallelRaceGroup.h>
 15#include <frc/smartdashboard/SmartDashboard.h>
 16
 17
 18
 19RobotContainer* RobotContainer::m_robotContainer = NULL;
 20
 21RobotContainer::RobotContainer() : m_autonomousCommand(
 22    // BEGIN AUTOGENERATED CODE, SOURCE=ROBOTBUILDER ID=CONSTRUCTOR
 23){
 24
 25
 26
 27    // END AUTOGENERATED CODE, SOURCE=ROBOTBUILDER ID=CONSTRUCTOR
 28
 29    // BEGIN AUTOGENERATED CODE, SOURCE=ROBOTBUILDER ID=SMARTDASHBOARD
 30    // Smartdashboard Subsystems
 31    frc::SmartDashboard::PutData(&m_wrist);
 32    frc::SmartDashboard::PutData(&m_elevator);
 33    frc::SmartDashboard::PutData(&m_claw);
 34    frc::SmartDashboard::PutData(&m_drivetrain);
 35
 36
 37    // SmartDashboard Buttons
 38    frc::SmartDashboard::PutData("Close Claw", new CloseClaw( &m_claw )); // {6}
 39    frc::SmartDashboard::PutData("Open Claw: OpenTime", new OpenClaw(1.0_s, &m_claw));
 40    frc::SmartDashboard::PutData("Pickup", new Pickup());
 41    frc::SmartDashboard::PutData("Place", new Place());
 42    frc::SmartDashboard::PutData("Prepare To Pickup", new PrepareToPickup());
 43    frc::SmartDashboard::PutData("Set Elevator Setpoint: Bottom", new SetElevatorSetpoint(0, &m_elevator));
 44    frc::SmartDashboard::PutData("Set Elevator Setpoint: Platform", new SetElevatorSetpoint(0.2, &m_elevator));
 45    frc::SmartDashboard::PutData("Set Elevator Setpoint: Top", new SetElevatorSetpoint(0.3, &m_elevator));
 46    frc::SmartDashboard::PutData("Set Wrist Setpoint: Horizontal", new SetWristSetpoint(0, &m_wrist));
 47    frc::SmartDashboard::PutData("Set Wrist Setpoint: Raise Wrist", new SetWristSetpoint(-45, &m_wrist));
 48    frc::SmartDashboard::PutData("Drive: Straight3Meters", new Drive(3, 0, &m_drivetrain));
 49    frc::SmartDashboard::PutData("Drive: Place", new Drive(Drivetrain::PlaceDistance, Drivetrain::BackAwayDistance, &m_drivetrain));
 50
 51    // END AUTOGENERATED CODE, SOURCE=ROBOTBUILDER ID=SMARTDASHBOARD
 52
 53    ConfigureButtonBindings();
 54
 55    // BEGIN AUTOGENERATED CODE, SOURCE=ROBOTBUILDER ID=DEFAULT-COMMANDS
 56m_drivetrain.SetDefaultCommand(TankDrive( &m_drivetrain )); // {5}
 57
 58    // END AUTOGENERATED CODE, SOURCE=ROBOTBUILDER ID=DEFAULT-COMMANDS
 59
 60    // BEGIN AUTOGENERATED CODE, SOURCE=ROBOTBUILDER ID=AUTONOMOUS
 61
 62
 63    m_chooser.SetDefaultOption("Autonomous", new Autonomous()); // {2}
 64
 65    // END AUTOGENERATED CODE, SOURCE=ROBOTBUILDER ID=AUTONOMOUS
 66
 67    frc::SmartDashboard::PutData("Auto Mode", &m_chooser);
 68
 69}
 70
 71RobotContainer* RobotContainer::GetInstance() {
 72    if (m_robotContainer == NULL) {
 73        m_robotContainer = new RobotContainer();
 74    }
 75    return(m_robotContainer);
 76}
 77
 78void RobotContainer::ConfigureButtonBindings() {
 79    // BEGIN AUTOGENERATED CODE, SOURCE=ROBOTBUILDER ID=BUTTONS
 80
 81frc2::JoystickButton m_dpadUp{&m_logitechController, 5}; // {4}
 82frc2::JoystickButton m_dpadDown{&m_logitechController, 7};
 83frc2::JoystickButton m_dpadRight{&m_logitechController, 6};
 84frc2::JoystickButton m_dpadLeft{&m_logitechController, 8};
 85frc2::JoystickButton m_l2{&m_logitechController, 9};
 86frc2::JoystickButton m_r2{&m_logitechController, 10};
 87frc2::JoystickButton m_l1{&m_logitechController, 11};
 88frc2::JoystickButton m_r1{&m_logitechController, 12};
 89
 90m_dpadUp.WhenPressed(SetElevatorSetpoint(0.3, &m_elevator), true);
 91m_dpadDown.WhenPressed(SetElevatorSetpoint(0, &m_elevator), true);
 92m_dpadRight.WhenPressed(CloseClaw( &m_claw ), true);
 93m_dpadLeft.WhenPressed(OpenClaw(1.0_s, &m_claw), true);
 94m_l2.WhenPressed(PrepareToPickup(), true);
 95m_r2.WhenPressed(Pickup(), true);
 96m_l1.WhenPressed(Place(), true);
 97m_r1.WhenPressed(Autonomous(), true);
 98
 99    // END AUTOGENERATED CODE, SOURCE=ROBOTBUILDER ID=BUTTONS
100}
101
102// BEGIN AUTOGENERATED CODE, SOURCE=ROBOTBUILDER ID=FUNCTIONS
103
104frc::Joystick* RobotContainer::getJoystick2() {
105   return &m_joystick2;
106}
107frc::Joystick* RobotContainer::getJoystick1() {
108   return &m_joystick1;
109}
110frc::Joystick* RobotContainer::getLogitechController() {
111   return &m_logitechController;
112}
113
114// END AUTOGENERATED CODE, SOURCE=ROBOTBUILDER ID=FUNCTIONS
115
116
117frc2::Command* RobotContainer::GetAutonomousCommand() {
118  // The selected command will be run in autonomous
119  return m_chooser.GetSelected();
120}
This is the RobotContainer generated by RobotBuilder which is where the subsystems and operator interface are defined. There are a number of parts to this program (highlighted sections):
Each of the subsystems is declared here. They can be passed as parameters to any commands that require them.
If there is an autonomous command provided in RobotBuilder robot properties, it is added to the Sendable Chooser to be selected on the dashboard.
The code for all the operator interface components is generated here.
In addition the code to link the OI buttons to commands that should run is also generated here.
Commands to be run on a subystem when no other commands are running are defined here.
Commands to be run via a dashboard are defined here.